Friday 2 December 2016

Cyberlink PowerDirector 15 review

http://www.cyberlink.com/products/powerdirector-ultra/

PowerDirector is one of the best value video editing programs available. Fast and feature rich, it is suitable for creating both professional and ‘serious amateur’ video projects. While it is not aimed at the ‘top end’ or cinematic video specialist, it is certainly capable of creating excellent quality, high definition videos to view online, on a mobile device, on a desktop computer monitor or on an HD TV.

PowerDirector 15

To create a video, you start by importing one or more video clips, along with any audio clips or images you may want to use. You then drop these clips onto multiple tracks in the editing timeline. Clips can be cut, copied or trimmed. You can smooth out the joins, if you wish, by adding transitions such as fades, blurs, wipes and all kinds of fancy animated effects.

The software also comes with visual and text effects which can be selected from a window and dragged straight onto a video clip. For a general overview of the features of PowerDirector, see my review of the previous edition, PowerDirector 14 or watch this short video overview.


At first sight, there is very little to distinguish PowerDirector 15 from the previous release. It looks  much the same as before with its multi-part environment: Capture, Edit, Produce and Create Disc and its three-part video editing interface: 1) the library from which tools and effects are selected, 2) the video previewer and 3) the multi-track timeline.

There are some handy new features too. For example, it can now do 360-degree editing. This lets you create videos that extend beyond the rectangular boundaries of the screen, allowing the user to scroll around to look ‘behind’ the foreground action. Bear in mind that you must have a camera capable of recording 360-degree videos in order to use this feature. I don’t have such a camera so I haven’t been able to test this. You can also place text in the 360 degree view so that, for example, labels can be placed over objects in any part of the panoramic display. 

This video shows an example of the 360 editor.


Other new or improved features include vertical video support to create movies that fit onto a  vertically aligned smartphone, a mask designer to let you mix clips in which one clip shows through a transparent shape in another clip, improved support for stop-motion videos, better colour correction tools, plus various improved rendering options.

On the whole, however, I’d have to say that, unless 360-editing is a vital feature for you, PowerDirector 15 is a fairly minor update to the previous release. It remains a good, well-featured, all-round video editor which benefits from a very fast renderer that produces finished videos at considerable speed.

For an overview of its principal features of PowerDirector 15 see HERE . The software comes in various editions ranging from the entry-level Ultra (£59.40) to the Director Suite (£164.99) which includes additional software to edit colour, audio and images.


Wednesday 19 October 2016

Camtasia 9 For Windows / 3 For Mac (Review)

https://www.techsmith.com/

Price: $199 (includes licence for both the Windows and Mac editions)
Upgrade from previous version: $99.50


It’s been a few years years since TechSmith released a major new version of its screen recording and editing suite, Camtasia. I reviewed the previous versions, Camtasia Studio 8 For Windows and Camtasia 2 For Mac  way back in 2012. Now TechSmith has released new versions of both the Windows and its Mac releases. And what’s more, a single license will get you access to both of those editions.

In the previous releases of Camtasia, the Mac edition looked cleaner and neater than the Windows one. In these new releases, the Windows version (seen here) looks almost identical to the Mac version.
As before, this version of Camtasia has a set of tools to let you record and edit activity on your computer screen. It also lets you record video from a webcam or import video recorded by a dedicated video camera. You can place clips on multiple tracks in a timeline and edit them by cutting and splicing them, zooming and panning or adding transitions such as fades and scrolls to smooth out the joins.

Camtasia specialises in recording from the computer screen. A recording tool is provided for both Windows and (as shown here) Mac. You can record the entire screen or predefined regions and, if you have a camera attached, you can also simultaneously record ‘picture in picture’ video to show, for example, a ‘talking head narration’ of the actions recorded from the screen.
If you are already familiar with previous versions of Camtasia for Windows, the first thing you will notice about Camtasia 9 is the slick-looking new interface. This cleans up the interface of version 8 which looked a bit of a hybrid with its white-background asset windows docked inside an environment with a dark colour-scheme. Camtasia 9 has an integrated dark colour throughout and it has adopted a plain ‘flat’ look instead of the rather clichéd ‘glass’ effects used in version 8.

The layout has been redesigned too. In common with Camtasia 8 it has a three-part layout with the top of the screen divided between the video preview window and an all-purpose tabbed panel containing clips, a narration tool, a callout panel, transitions and so on. In Camtasia 8 the pages of this panel were selected by clicking buttons at its bottom edge. There was not enough space to accommodate all the buttons so additional pages had to be selected by clicking a ‘More’ button. In Camtasia 9, the buttons are placed at the left edge of the panel so all the page tabs can be seen simultaneously. In addition, there is a new Properties panel that lets you adjust the position, size and rotation of video clips and the volume of audio clips.

A single panel contains tabbed pages from which you can select transitions, cursor effects, behaviours and animations.
For users who plan to use Camtasia on both Windows and a Mac, the big new feature is the ability to exchange projects seamlessly between the two versions. You can create a project on Windows and load it up in Camtasia 3 on the Mac or vice versa. Previously the only way of sharing videos between the Windows and Mac versions was to render a finished video using Camtasia on one platform and then load up that video into a new project on the other platform.

This is the Mac edition of Camtasia which, even though it is only version 3 is now very similar in both look and functionality to Camtasia 9 on Windows.
This release of Camtasia has a number of interesting new capabilities such as Behaviours and Animations. At first sight the differences between Behaviours and Animations is not obvious. Both of these let you drop onto a clip some predefined animated effect. For example, if I drop a Scale-down animation onto a clip, the dimensions of the video are reduced over a set period. Similarly, a Scale-up animation increases the video dimensions and a Tilt-right animation zooms out and positions the video clip at the right of the screen.

Behaviours include effects such as ‘Jump and Fall’ or ‘Popup’. The Jump and Fall behaviour causes a video clip to drop down from the top and bounce. The Popup behaviour causes a clip to swing into view from a selected side. Both the behaviours and the animations can be tailored using the properties panel. For example, a Popup behaviour may be made either smooth or bouncy; a Scale-up animation may be made slow or fast. On the whole, animations work rather like the zoom, pan and ‘visual properties’ of earlier releases of Camtasia (in fact, Zoom-and-Pan has its own ‘sub-page’ inside the Animations page). The Behaviours work more like the text and video effects that you will often find in general-purpose video editing packages.

The new ‘behaviours’ let you apply animated effects to selected clips, images and callouts. Here I have added a behaviour to the ‘speech bubble’ callout so that it drops into the video and bounces. The speed and bounciness of this behaviour can be adjusted using the Properties panel docked at the right of the screen.
Other new things in this release include lots of new resources that you can use in your projects. These include animated backgrounds, music tracks and various slides and ‘lower third’ graphics that can be used as overlays in, for example, the title sequences of videos. There are also more annotations provided as standard to let you drop captions and ‘callouts’ into a video. In addition, some features that were previously only available in the Windows version of Camtasia - notably quizzes and clip-grouping - have been added to the Mac version.

Camtasia comes with various ready-to-use graphics such as this animated background.
In spite of all the tweaks and additions to Camtasia 9, I have to say that there are no really huge new changes here. Broadly speaking Camtasia 9 has a similar set of features to Camtasia 8 on Windows. The interface been given a much needed redesign and numerous improvements to usability have been made. Perhaps the single biggest improvement is the increased ease of project exchange between the Mac and Windows plus the addition of some features to the Mac release which hitherto had only been available to Windows users. Personally, I would have liked to have seen a far bigger expansion in the Camtasia library of effects, animations and transitions; these are still very limited when compared to the effects provided by many general-purpose video editing suites. Even so, for screencast recording and editing, Camtasia is still my favourite product for the simple reason that it is fast and easy to use.

Wednesday 28 September 2016

Opera – the browser that came in from the cold

Opera used to be my favourite web browser. But that was long ago. Since then I’ve moved on:  these days I generally use either Firefox, Chrome or Vivaldi. On Windows 10, I use Edge and on my iPad I use Safari. What the heck, a browser is just a browser after all!

So why have I now installed the new version of Opera? And why is it rapidly becoming my favourite browser? Two reasons: VPN and ad-blocking.


Opera now has VPN (Virtual Private Network) browsing built in. You just pick a country from a drop-down list and Opera lets you log on from your selected ‘virtual’ location. In principle this enhances your privacy and keeps your browsing anonymous. Well, I never really believe I have any privacy online, so I take the promise of anonymity with a fairly large pinch of salt.  But even so, I love Opera’s VPN. It lets me browse American web sites as though I am browsing from America. So I can easily check manufacturers’ prices quoted in dollars instead of pounds, and I can log onto CNN’s American news instead of its International news. Read more about Opera’s VPN here:  http://www.opera.com/blogs/desktop/2016/04/free-vpn-integrated-opera-for-windows-mac/

The other thing I really like about the Opera is its ad-blocker. With other browsers you generally have to install some kind of extension to blocks ads. With Opera it’s a standard feature. This means I am now able even to read ad-intensive sites such as the UK’s ‘Independent’ online newspaper which, in Firefox, has so many damn’ ads that it often causes the browser to grind to a standstill.

So, after years apart, Opera and I are back together again. So far, it’s looking so good that it may soon become my default browser. You can download Opera here:  http://www.opera.com

Monday 12 September 2016

Microsoft’s free cross-platform IDE, Visual Studio Code 1.5

Microsoft has just released a new version of its cross-platform editing and debugging suite: Visual Studio Code 1.5. With support for a broad range of languages including C, C#, Ruby, JavaScript and Java, VS Code can be run on Windows, OS X or Linux. If you program one or more languages on any of these platforms, this is certainly a tool worth having.

You can download VS Code here: https://code.visualstudio.com/

Bear in mind that some tools and support for some programming languages requires the addition of optional free extensions which can be found here (and some of these, such as the Object Pascal extension for Windows, may only be available on specific platforms): https://marketplace.visualstudio.com/VSCode

Friday 2 September 2016

Don’t Use LibreOffice 5.2.0 for Windows!

In short – it crashes. I’ve installed this version on three different PCs – two running Windows 7, one running Windows 10 – and the result is the same on each. When I create a new text file in the Writer application, a crash dialog pops up prompting me to recover the document I’m trying to open. I recover it but the next time I try to open it, the same thing happens all over again.

The good news is that the latest pre-release edition (currently 5.2.1) appears to solve this problem. For all I know, it may have other problems – it is a pre-release edition, after all – but at  least it doesn’t keep bombing out whenever I try to open a document.  I haven’t found any online reports on the 5.2.0 crash problem, so I suppose it is just possible that there is some specific problem with each of the three PCs I tested it on. At any rate, if you encounter the same issue, I recommend that you too give the pre-release version a try. Downloads are available here: https://www.libreoffice.org/download/libreoffice-fresh/

Incidentally, while LibreOffice is a decent free office suite, it isn’t the only one. There are at least a couple of others (not counting LibreOffice’s close relative, Open Office) that are worthwhile trying out. I’ll be writing about a couple of these soon.

Wednesday 24 August 2016

Get Delphi (Object Pascal IDE) Free!

Delphi is Embarcadero’s well-known visual IDE for creating Object Pascal programs just like the ones I create in my Learn To Program With Pascal course. I was the Delphi programming columnist for PC Plus magazine for over 10 years and I still love the language and the IDE.

Delphi usually costs a few hundred dollars to buy. But if you act quickly, you can get a copy of Delphi FREE. Today Embarcadero announced a time-limited offer that gives you a 100% discount off the Delphi Starter Edition. I strongly urge you to take advantage of this. Delphi is a lovely program and Object Pascal is a great language.

You can download a free copy here: https://www.embarcadero.com/products/delphi/starter/promotional-download

Wednesday 6 July 2016

MAGIX Video Pro X8 Review

MAGIX Video Pro X8 £349
http://www.magix.com/gb/video-pro-x/

MAGIX Video Pro X8 is a powerful video editing program for Windows. It lets you import video and audio clips, synchronise and edit them on tracks in a timeline and produce a final video in a variety of standard formats, or burnt to a DVD or Blu-ray disk.


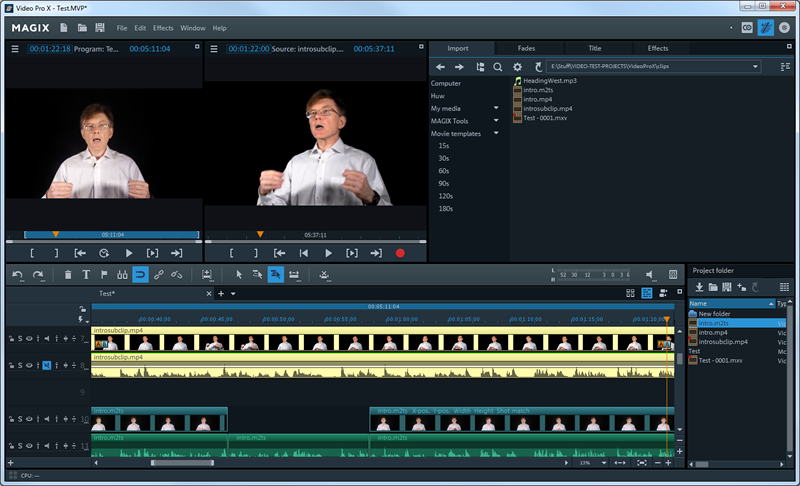
The workspace is broadly similar to other video editing programs. At the bottom half of the screen there is a multi-track timeline onto which you place your source clips. Above this there is a vertically-split area. To the left is the video previewer. To the right is a multi-function tabbed panel where you can browse files on disk, select fades, transitions and effects or add titles in predefined styles. The video preview area is further subdivided so that one part shows the video on the timeline while another part shows the clip selected in the file browser. If this layout is not to your taste it can be configured by moving and resizing windows and saving your arrangement by name. There are also some preset window schemes including one to optimize the layout across multiple monitors.

As two video clips can be viewed simultaneously, this makes it easy to make adjustments to colour and contrast so that, for example, two videos recorded by different cameras (which may have different ‘colour temperatures’) can be adjusted to look more like one another. Colour and contrast adjustments can be made at a precise level by tinkering with individual options and parameters. Alternatively, a more automated way of matching the colours of clips is provided by the new ‘shot match’ tool.

This 
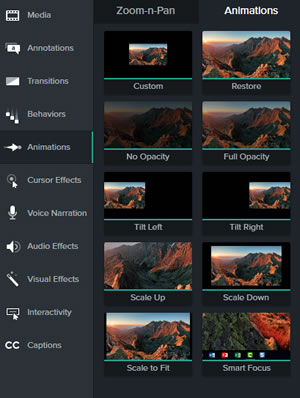
Shot Match tool displays two clips in the adjoining preview windows and lets you immediately apply the colour characteristics from one clip to another. If the end result is not quite what you want you can use a colour ‘pipette’ to select specific colours from the first clip and apply them to the second clip. For example, when I applied the colours from one clip to another, I found that the flesh tones looked a bit washed out in the target clip. So I selected a face in clip 1 and applied it to the face in clip 2. Now the flesh tones were right but the white of a shirt in clip 2 had taken on an undesirable orange tinge. So I selected the shirt in clip 1 and dropped the colour onto the shirt in clip 2. This fixed the problem so that the colours in both clips now looked pretty much identical.

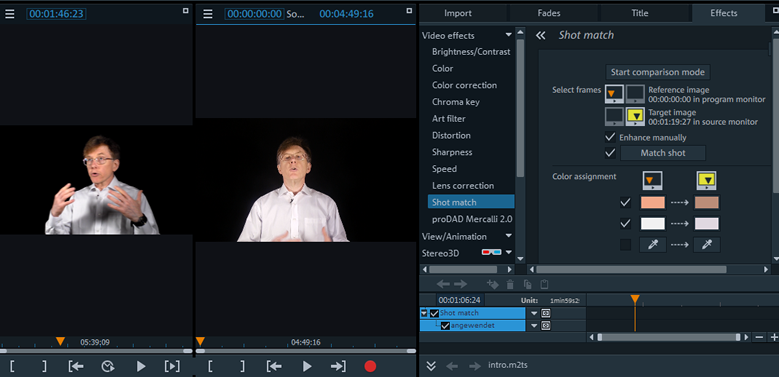
The Shot Match panel on the right lets me copy colour information from one clip and apply it to another
Effects such as colour matching, zooms, rotations and filters are all applied to specific sections of a video as keyframes on a timeline. The keyframed timelines are shown in their own docked editing window which gives you a fine level of control over the effects. However, effect keyframes can be fiddly to edit as the effects timeline panel is quite small and cramped in the default window layout. If you have a multi-monitor system, however, you can give more screenspace to the panel by placing the video preview on a second monitor. In fact, you can even undock the effects timeline and maximize it on a second monitor if you need to do serious editing work.

There is also a fairly sophisticated built-in audio editor. This lets you tinker with the sound on multiple audio and video tracks, making adjustments to the stereo mix, normalizing audio (to achieve a consistent volume) across multiple tracks, remove background noise (hums and hisses) and apply effects.

If you need to add titles and captions, that’s no problem. Click an icon to add some text and then set its properties (font, colour, animation) in a panel or select a title pre-set with styles, graphics and animations predefined.

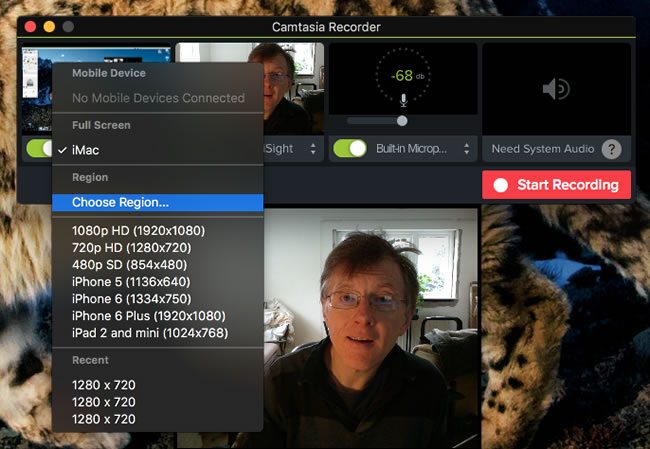
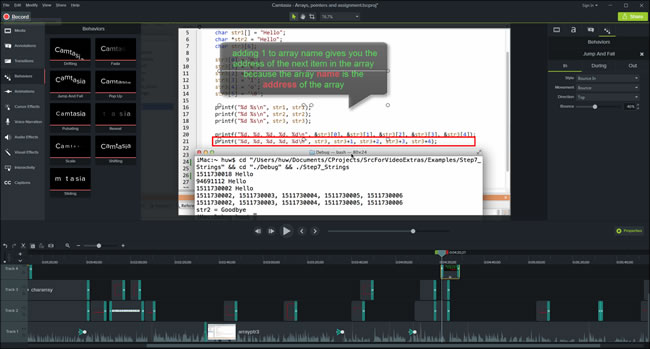
There is a screen recording tool for making screencasts

To get started on a new video, you need to create a project and select a directory on disk as the ‘project folder’ which contains the source clips. You can also import or record new clips from a connected camera, webcam or microphone. A screen recording tool lets you record ‘screencast’ clips direct from your PC’s screen. When recording from the screen you can select rectangular areas in various standard sizes.

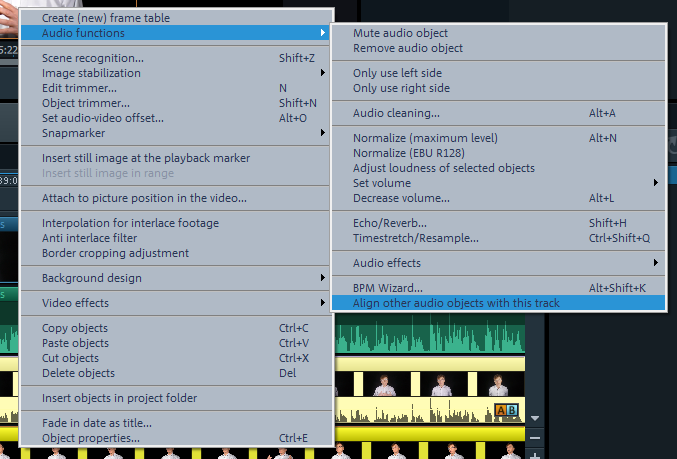
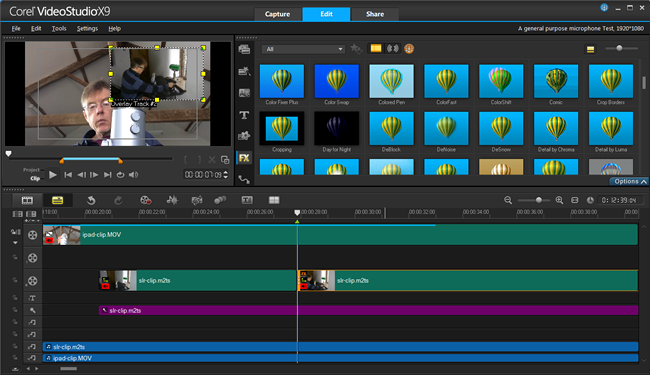
You can auto-align tracks simultaneously recorded by two cameras
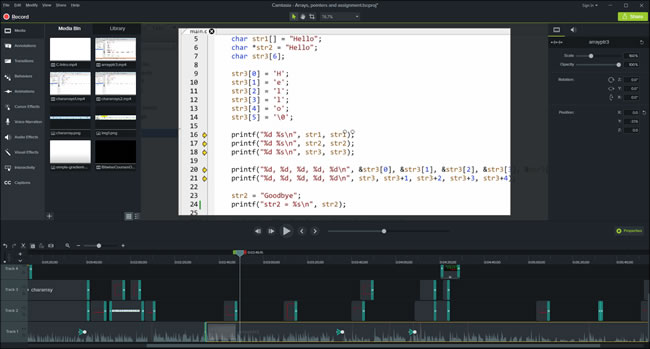
 Optionally the audio can be separated from the video and shown, with its waveform, on a separate track. Unlike some rival programs, such as Cyberlink Power Director, the view of the waveform remains visible when you move tracks, which facilitates the precise visual alignment of tracks recorded by two cameras or by a camera and a microphone. In fact, while this sort of visual feedback is useful in most cases it may not be needed since you can just select two tracks and auto-align them from a popup menu item. There is also a very neat multicam editor that lets you import up to nine tracks, synchronize them and edit them together interactively. Unlike similar tools in some other video editing applications, the multicam editing takes place in the main editor, not in a popup window. You just have to be sure to leave the top two tracks free. Then when you play the videos on the timeline, each clip is shown in its own little preview box. To edit the clips together during playback you just click the preview box of the clip you want to appear in the final video at any given moment: click the clip on track 3 at the five-second position and that clip is added to the final video that is being assembled in track 1; now click the clip in track 4 at the ten-second position and that clip is added, at that time-mark, to the video being assembled in track 1. The audio from the selected clips is simultaneously added to track 2. However, if you want to use a ‘master audio’ track to be used throughout the final video, you can assign that to track 2 instead. This is a very neat tool that makes it very easy to synchronize and edit together multiple camera shots for your final video.

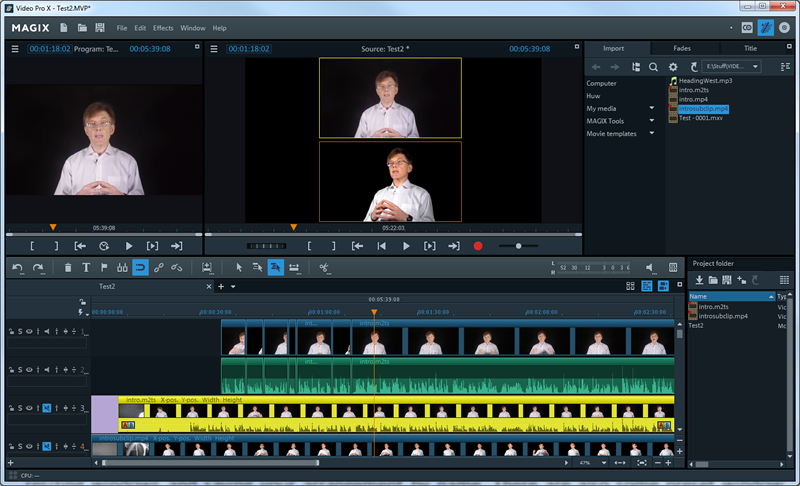
The multicam editor lets you edit together a final video simply by clicking the desired preview of a video track to add it to the final video at a specific time-slot
On the whole VideoPro X is a nice, fast and responsive program that makes it simple to edit and produce videos. Even though it has many quite advanced features, the learning curve for a newcomer is not too steep. In fact, if you have already used some other video editor, you will probably be able to get started with this software in a matter of minutes. The one thing I do find slightly annoying is its use of cascading popup menus. For example, if you want to align the audio of two tracks you have to right-click a track to show one menu then select the function you need from a second menu that pops up alongside the first. The navigation between the two linked menus can be a bit hit-and-miss (the second menu vanishes if you don’t move your mouse directly onto it) but this is a relatively minor criticism. One other unremarkable feature is the rendering speed - when producing the final video - which is quite sluggish. Even with hardware acceleration turned on, it takes much longer to produce a video than with Cyberlink PowerDirector (whose fast rendering is a notable feature which I only wish other programs could match). On the plus side, however, all the principal functionality is gathered together in a single unified editing interface. You won’t have to load separate environments or modal dialogs in order to edit and produce your videos.

When evaluating any piece of software, it all boils down to one important question: would I want to use this on a regular basis? The answer to that is an emphatic yes. Video Pro X is significantly better than low-end packages such as Corel VideoStudio Pro (at about £60), it is cheaper than high-end packages such as Davinci Resolve Studio (over £700) or Adobe Premiere (licensed annually for about £200 per year). I would have said that one of its closest competitors was Sony Vegas (about $600), so it is interesting to note that MAGIX has recently acquired Sony Vegas, and some other Sony software products. No specific information on how the company intends to develop Vegas or position it against Video Pro X was available at the time of writing. I have been told that the intention is to retain them as two distinct products, however, rather than to attempt to combine their functionality.

Overall, it is my view that Video Pro X’s combination of a good range of features and a well-integrated environment gives it the edge (apart from its slower video rendering speeds) over a mid-range package such as Cyberlink PowerDirector (at £150 to £350 for the top-end editions; see my review: http://bitwisemag.blogspot.co.uk/2015/10/powerdirector-14-review.html). Also, bear in mind that MAGIX fairly often runs special discounts (I see these advertised all the time on Facebook and elsewhere). So if you shop around you may even be able to get Video Pro X at a bargain price.


NOTE: The software was reviewed on a dual monitor PC with Intel I7 (3.3 GHz) and 16GB RAM, Windows 7, NVIDIA GeForce GTX 980 Ti graphics card with 6GB RAM


System requirements
Microsoft Windows XP | Vista | 7 | 8
Minimum configuration: Intel Core Duo with 1.83 GHz, AMD Dual-Core with 2.0 GHz, 1GB RAM, Onboard graphics card with a screen resolution of at least 1024 x 768, Internal sound card, Hard drive space: 1 GB (for minimum installation), DVD drive
Minimum requirements for HD/3D editing: Intel Core 2 Quad-core processor with 2.83 GHz (Intel Core i7 recommended), AMD Quad-core processor with 2.8 GHz, 4GB RAM, Dedicated graphics card with 512 MB VRAM or more, Multi-channel sound card recommended for Surround sound editing, Hard drive space: 4 GB, Blu-ray burner to create Blu-ray Discs


Import and export formats
Supported import formats:
Video: DV, HDV, AVCHD, H.264, XDCAM, NXCAM, DVCPRO, AVC-Intra, Stereo3D, AVI, MPEG-1, MPEG-2, MPEG-4, M2TS, MJPEG, MKV, MTS, MXV, QuickTime, WMV(HD), VOB, TOD, TS, DVR-MS, uncompressed video
Audio: AAC, MIDI, MP3, OGG, WAV, WMA
Photo: BMP, GIF, JPEG, PNG, TIF, TGA
Supported export formats:
Video: AVI, DV-AVI, MJPEG, MPEG-1, MPEG-2, MPEG-4, WMV
Audio: MP3, WAV
Photo: BMP, JPEG

Licence: A single licence allows the software to be installed on two computers

Friday 24 June 2016

LandscapePro Studio Review


http://www.landscapepro.pics/

LandscapePro Studio is an image editing program specialising in landscapes. If you have a landscape photo that looks flat and uninteresting, you can load it up into  LandscapePro and quickly change its colours, alter its lighting or even completely replace a boring-looking sky with one that’s more dramatic.


The software comes in two editions – Standard and Studio (available for Windows or OS X). The Studio edition provides all the same editing capabilities as the Standard edition but is also supports some additional file formats and it has the option of being used as a Photoshop (or Photoshop Elements and Lightroom) plugin. The Standard Edition costs £59 (but at the time of writing it is on offer at £29.95). The Studio Edition costs £99.90  (but is currently on offer at £49.95). You can find a comparison of the features of the two editions on this page: http://www.landscapepro.pics/editions/

To edit a landscape you start by loading a photo and then selecting its principal elements by dragging labels (such as ‘Sky’, ‘Water’, ‘Mountain’, ‘Animal’ or ‘Person’) onto it. The software analyses your picture and makes a ‘best guess’ selection of each of the labelled elements. As its guesses are unlikely to be 100% accurate you can help it make a better match using tools to drag out the selected areas to define the exact boundaries between adjoining elements. LandscapePro then recalculates its selections and, in most cases, makes a reasonable attempt at finding the edges between, say, a person and the background or between the sea and the sky.

Just drop labels onto an image to select elements such as the Sky
It is even possible to isolate objects, such as buildings, trees and bridges which only partly obscure the sky. This makes it possible to add a new sky to a picture and have it ‘show through’ in the gaps of the foreground object.

You can drag out the coloured regions to fill in any gaps in the selection of sea, sky etc.

When you are satisfied that the essential elements have been correctly identified you can enhance or replace them by making selections from another panel. For example, you could change a dull grey sky into a tropical sunset. Or you could set colour parameters to make the grass greener and the sea bluer. You can even change the effective position of the sun so that the highlights and shadows in a scene are changed. You can also set styles to affect the whole picture. For instance, you can change a colour picture to black and white, add vignettes and increase the contrast or sharpness.

To change the colours scheme, lighting and sky, just select presets from the panel at the left

While it generally works well, there are a few little irritating niggles. For example, the ‘save as’ option drops down under the ‘save’ icon. But if you click the ‘save’ icon without holding down the mouse button to make the drop-down appear, the image overwrites the existing image on disk without giving you an option to save using a new name. At least there is an Undo option to get back to an earlier version. I would also like as clear ‘Project save’ icon. I eventually discovered that you can save a session (the image plus its defined areas) by saving using the ‘.lp’ file extension. This is far from obvious, however, and would be much better provided as a totally separate option. I would also like better help. The help at the moment is no more than a page of text. There are some tutorials online too, but more comprehensive documentation would be highly desirable.

And that is just about all there is to say about this software. For a reviewer, that’s bad news. It is simple to use and it works. There really isn’t much more to say about it. For a user, of course, that is great. There is next to no learning curve and it fixes your photos rapidly and easily.

Here is a picture prior to processing it in Landscape Pro. It’s an old holiday photo – a nice scene but rather bland and ‘washed out’.

In just a few minutes, I’ve been able to brighten the colours and add a more interesting sky.

But I eventually decided that more threatening weather would be more atmospheric. A few more clicks and it’s done!
LandscapePro is a product from Anthropics Technology  – a London-based company that specialises in image-enhancement software. I have previously reviewed its Smart Photo Editor which rapidly applies effects and improvements to all kinds of images, and (probably its most famous product) Portrait Professional which lets you alter facial images to remove blemishes, make subtle (or not so subtle) changes to skin tone and face-shape or even to add ‘digital makeup’. What that program does for faces, Landscape Pro does for scenery.

In short, if you need a program that enhances and changes your landscape photographs without forcing you to spend hours doing everything the hard way in Photoshop, get Landscape Pro.

Tuesday 31 May 2016

Corel VideoStudio X9 Review

http://www.videostudiopro.com/en/products/videostudio/

With a new multi-camera editor and motion-tracking, improved performance and more video and audio effects, Corel VideoStudio X9 is aiming to appeal to serious video makers on a tight budget. The software comes in two editions - VideoStudio Pro X9 at £59.99 (inc VAT) and VideoStudio Ultimate X9 at £79.99. The principal difference is that the Ultimate edition supports up to six cameras in its multi-camera editor (Pro supports four) and it comes with more video-enhancing effects and filters. Corel has a version comparison chart here: http://www.videostudiopro.com/en/products/videostudio/pro/#compare


I last reviewed Corel VideoStudio back in 2011 (version X4) http://www.bitwisemag.com/2/Corel-VideoStudio-Pro-X4.html. At first sight, X9 looks pretty similar to X4: its main editing screen is divided into three areas with the multi-track timeline, where you arrange your video and audio clips, occupying the bottom half. This leaves the top half of the screen divided between the video preview and the Library which is where your source files are arranged.

To the left of the Library there is a set of buttons that can be clicked in order to browse through sets of Transitions (fades, wipes, page-folding effects and so on), Titles (to add animated text effects), Graphics (static images), Effects (everything from coloured ‘filters’ to sparkles, ripples, distortion effects and rotations), and Paths (to move selected videos in predefined directions). In addition a set of ‘Instant Projects’ are supplied. Drag one of these onto the timeline and it will automatically add a whole set of graphics, effects and ‘placeholders’ to be replaced by your video clips - this may be useful to novice users and could also be a time-saver if, for example, you need to add a slick intro or outro to a video in a hurry.

In addition to the video editing environment there are also ‘Capture’ and ‘Share’ environments. You can select these by clicking tabs at the top of the screen. In the Capture area you can grab video from a connected camera or you can start the screen capture tool to record video direct from your computer screen.

The Share workspace is where you produce and save your video. Here you can select various video formats - AVI, MOV, WMV, MPG-4 and so on - and make adjustments to the size, frame-rate and other parameters.

The multi-camera editor


One of the things I commonly need to do is to synchronize two clips (either two videos shot simultaneously by two cameras or else a video clip with an audio track recorded using a separate microphone). Some video editors let you synchronize by aligning the wave-forms by eye - that is, by looking at the audio ‘graph’ on two tracks and simply matching up the peaks and troughs. Others have built-in tools to analyze and synchronize automatically. VideoStudio doesn’t show a ‘live’ view of the wave-form to aligning tracks by eye is a non-starter. It does have a multi-camera editor, however, which is a popup window into which multiple tracks can be imported and auto-synchronized. This works reasonably well, but it is not as simple and convenient as the sound sync tool in Cyberlink PowerDirector which just lets you select two tracks in the main editing window and immediately synchronize them.


You can normalize audio on multiple tracks

When working with sound you can enable the Sound Mixer tool which lets you set audio points on a selected track and make adjustments to the volume and stereo balance. A new Normalize Audio tool lets you select multiple clips and automatically adjust the volume so that clips recorded at a lower volume are boosted to about the same level as clips recorded at a higher volume.

A new tracking feature lets you select a point or an area (such as a face or a person) and generate a ‘tracking path’ that represents the motion of the selected object throughout a video clip. You can then have that objects pixellated (to hide someone’s identity or blur out sensitive information) or you can use the track to add another object such as a piece of text or a small video clip so that this object moves over the main video, following the tracking path. This is a useful feature but it can be quite fiddly to use as you have to pop up two lots of dialogs - one to create the path, another to add an object to it.

In addition to these and a few other new features (including some editing and performance improvements plus the addition of new file formats aimed at optimizing file sizes with high definition videos) VideoStudio also has all the features you would expect of any decent video editing package. It lets you split and copy clips, it lets you zoom and crop, adjust the speed and make slow-motion and stop motion videos. It comes with a screen capture tool so you can create screencasts by recording direct from your computer’s screen. It has a fairly large collection of transitions and fancy visual effects to alter the colour scheme or add distortions and artistic effects (such as sketch and emboss) to your videos.

All in all, it’s a decent, good-value, video editor. I find some of its tools (such as the motion tracker) over-fussy and some of its effects a bit too gee-whiz for use in videos that aim to look reasonably professional. Overall, I don’t think it is as good as Cyberlink’s PowerDirector 14 (see my review http://bitwisemag.blogspot.co.uk/2015/10/powerdirector-14-review.html) which, at a starting price of around £60, is a clear competitor. PowerDirector itself is far from perfect. Some of its tools (such as Zoom and Crop) are harder to use than they need to be, it too fails to show a ‘live’ draggable view of audio wave-forms and, in my experience, it has some reliability problems (it can suddenly exit when you are least expecting it). Nevertheless, I think PowerDirector is a more satisfactory editing package overall.

Saturday 16 April 2016

Microsoft’s free cross-platform Visual Studio Code

Microsoft has just released version 1.0 of a new, free, cross-platform development environment called Visual Studio Code. This could be of interest to just about all programmers no matter which operating system or language you are using.

Visual Studio Code supports the editing and debugging of over 100 programming languages on Windows, Linux and OS X. There are also over 1000 extensions – add-ins that extend the IDE’s capability with additional tools and language support. So whether you are programming JavaScript, C#, Ruby, Python, Java, PHP or C++, Visual Studio Code could be a useful tool to have.

Note that, in spite of its name, Visual Studio Code is a completely different product from Visual Studio. The standard version of Visual Studio has many more built-in tools (including visual interface designers) than Visual Studio Code, but it supports far fewer languages and runs only on Windows. A free ‘Community edition’ of Visual Studio For Windows is also available.

You can download a free copy of Visual Studio Code here:
https://code.visualstudio.com/

Thursday 24 March 2016

Learn Smalltalk for Free

Dolphin Smalltalk for Windows is a beautiful implementation of the Smalltalk language and programming environment.  If you are sincerely interested in understanding the great ideas of object orientation, go and learn Smalltalk.

Dolphin Smalltalk
Smalltalk is one of the most influential programming languages ever invented. It was using networking, mouse-control and a graphical user interface at a time when most computer users hadn’t even heard of those things. Steve Jobs saw Smalltalk at the Xerox PARC (Palo Alto Research Centre) back in the 1970s. He later said: “The first thing they showed me which was the graphical user interface. I thought it was the best thing I'd ever seen in my life… it was obvious to me that all computers would work like this some day.”

And as if that wasn’t remarkable enough, Smalltalk also did object orientation. At a time when almost all other programmers were using ‘procedural’ languages such as C, Pascal, COBOL and BASIC, Smalltalk programmers were creating objects that sent messages to one another. To say that it was ahead of its time is an understatement.

Fast-forward to today. The world of computing has changed beyond recognition. We all use graphical user interfaces and almost all modern programming languages use some form of object orientation. I say “some form” because in most cases the simple, elegant ideas of Smalltalk have been adapted and, arguably, spoiled. And people who use the object orientated features of these languages may be missing out on some of the big ideas. Programmers of Java, Ruby or C++ may understand classes and hierarchies but often they have little idea of ‘black box encapsulation’ or ‘message passing’. If you really want to understand object orientation in its neatest and purest form, go and learn Smalltalk.

As I said earlier, Dolphin Smalltalk is a beautiful implementation. On the Windows platform it is certainly my favourite. The only trouble is that it has always been a bit expensive. Not any longer. A few months ago, it was made free and open source. Now I am ambivalent about that. On the one hand, I think it’s sad that the demand for a high-quality Smalltalk system was not sufficient to allow the developers to continue with Dolphin Smalltalk as a commercial product. But on the other hand there can be no doubt that this is great news for those people who might be interested in trying Smalltalk but not sufficiently interested to take a risk in stumping up the cash to buy it. At any rate, take it from me that Dolphin Smalltalk is a terrific product and if you are a Windows programmer you should do yourself a favour and grab a copy.

Download Dolphin Smalltalk HERE.

Incidentally, if you are not using Windows there are also some good free Smalltalk systems for other platforms. The two I’d recommend are Squeak and Pharo.

For more on Dolphin Smalltalk, see my short tutorial HERE. I also have a number of other articles on Smalltalk language and history HERE.

Tuesday 26 January 2016

Smart Photo Editor

£39.90 (but may be on special offer)
http://www.smartphotoeditor.com

If you want to jazz up your photos by enhancing the colours, adding artistic effects, replacing the background or getting rid of unwanted objects (and people!) you may think you’d need to invest a few hundred dollars to buy a copy of PhotoShop, then invest many days of hard effort learning how to use it. In fact, Smart Photo Editor makes light work of all these tasks and costs less than £40 (about $56) for either the Mac or Windows edition. In fact, at the time of writing it is on special offer so if you are fast you may be able to get a copy at half price!

The simplest way to modify an image is by selecting a ready-to-use effect from a gallery containing several thousand effects, many of which have been created and submitted by users of the software. In this way, it is easy to change a colour photo to sepia or black and white, lighten shadows, deepen colours, apply artistic effects to make a photo look as though it is a drawing or a watercolour painting, add borders, vignettes and so on.
Here I have applied an instant effect to make my photo looking like a colour illustration.
If you only want to apply an effect to a selected area of the image you can apply a mask first. You can create masks by painting around the edges of a selected area using the mouse. The masking ‘brush’ automatically calculates the edges between the selected and deselected area so won’t have to be pixel-accurate in drawing around  the edges of a building or every hair on a person’s head. As long as there is reasonable contrast between the two areas, the brush generally does a pretty good job of figuring out the precise details of the contours. Then, you can use the mask to do things such as making the selected area monochrome while leaving the remainder in colour, or adding an artistic effect to the background while leaving the foreground untouched.

Options are supplied to make it easy to replace the sky in your photo with a more dramatic alternative or to defocus the background to put more emphasis on the foreground. If you want to tidy up a photo by removing unwanted elements you can select the items to remove; then you can fill in the deleted areas with textures taken from the surround areas. This works best if the surrounding  areas are of a fairly consistent or texture – sea, sand or grass, for example. It would not be so simple to remove objects from a busy street scene.  
The sky in this picture is pretty boring so I’ve added a mask to the sky…
…then I’ve selected a more dramatic sky from the Smart Photo Editor gallery and it is immediately added to my picture.
Although in many cases the ready-to-use effects may do all you need, you can also tailor each effect by adjusting parameters using sliders arranged in a docked panel.  For example, you could use one slider to change the contrast and another to change the exposure. Yet more sliders can be used to control various artistic effects such as crayon drawings and watercolour paintings. And for the really ambitious effects creator there is even a dedicated effect editor that lets you design and save your own effects.

Here I have tried out various effects on a photo. You can see the original photo at the top left and the same photo with added effects in the other three images.
The software includes many standard image editing features to let you pan, crop, deskew and resize pictures.  In addition to running as a standalone application the Studio Edition (£69.99 but once again, watch out for offers) may optionally be used as a ‘plugin’ with PhotoShop or PhotoShop Elements.  See here:  http://www.smartphotoeditor.com/editions/
Smart Photo Editor is really a very impressive piece of image editing software. At its current offer price of just £19.95, it is definitely a bargain.

Monday 11 January 2016

Which programming language should you learn next?

This is a question that I'm often asked. "I know one language? Which one should I learn next?" My advice to people is generally to think less about the specific language than about the principles. Do you need to learn how to structure and maintain your programs? Do you really understand encapsulation and modularity? What about low-level programming? Are pointers and addresses a mystery to you? At any rate, this short video may give you a few ideas...