Wednesday 18 July 2018

I Know Your Password - now let me blackmail you!

I know XXXXXXXX one of your password. Lets get right to purpose. You may not know me and you are probably wondering why you're getting this e-mail? No one has paid me to investigate about you.
I just received an email that started with the above text. Actually, the email was put into my Spam bin but I was browsing through when I noticed that the email header was quoting a genuine password that I have used in the past. "That's odd," I thought. So I read on. This is how the email continued...
In fact, I actually setup a software on the adult streaming (sex sites) website and there's more, you visited this web site to experience fun (you know what I mean). While you were viewing video clips, your browser started functioning as a Remote control Desktop that has a keylogger which gave me access to your display screen and web cam. 
Immediately after that, my software obtained all of your contacts from your Messenger, FB, as well as e-mail . After that I created a double-screen video. 1st part displays the video you were watching (you've got a nice taste rofl), and next part displays the recording of your webcam, & its u.  
You actually have 2 possibilities. Lets go through these possibilities in particulars:
First alternative is to just ignore this email. In that case, I most certainly will send your recorded material to every one of your contacts and thus consider regarding the disgrace you will definitely get. Not to mention if you are in a loving relationship, just how it will eventually affect? 
In the second place option would be to compensate me $3500. Lets name it as a donation. In this scenario, I most certainly will without delay erase your videotape. You can continue on everyday life like this never occurred and you surely will never hear back again from me.
You will make the payment through Bitcoin (if you don't know this, search for "how to buy bitcoin" in Google).
BTC Address to send to: XXXXXXX
[CASE SENSITIVE copy & paste it] 
In case you are looking at going to the authorities, surely, this e mail cannot be traced back to me. I have taken care of my actions. I am not looking to ask you for money a lot, I want to be paid for. I've a specific pixel in this e mail, and right now I know that you have read through this email message. You have one day to make the payment. If I do not receive the BitCoins, I will, no doubt send out your video to all of your contacts including family members, co-workers, and so on. Nonetheless, if I receive the payment, I will erase the video immidiately. If you want proof, reply with Yeah! and I will certainly send your video recording to your 5 contacts. This is the non-negotiable offer, that being said do not waste my personal time and yours by replying to this email.
OK, so this is a scam but it's a pretty interesting and deceptive one as it relies upon the receiver having more technical literacy than many simpler ("I'm a Nigerian prince, I want to send you money") scams. It assumes a) that you recognise your own password and know that other people should not have access to it and b) that you know what a keylogger is (it records and sends back to the bad guys the keystrokes you enter on your computer). It also assumes you understand Bitcoin and may at least be sufficiently baffled by the "hidden pixel" guff to think it's genuine.

OK, so I tracked down the password it mailed me. I had used it once, many years ago, when logging into a very innocent-looking site all about foreign language learning. The chances that a keylogger recorded my password all those years ago and the bad guys have only now decided to blackmail me seemed remote. Much more likely that the security of that site has been compromised, the bad guys got a whole load of old passwords and the rest of the email is pure nonsense.

Sunday 15 July 2018

MAGIX VideoPro X 10 – review

https://www.magix.com/us/video/video-pro-x/ $399 / £299

According to MAGIX, “On the occasion of the software’s 10 year anniversary, MAGIX Software is introducing the largest update for Video Pro X ever to the market.” Well, let’s see if the software lives up to that claim…

Video Pro X is a Windows video editing package that lets you create movies from multiple video and audio clips. You just add the clips to tracks on a timeline, cut, trim, move and edit the clips, add effects and transitions if required, then export in a variety of video formats. There are, of course, lots of other video packages that do his. So what sets Video Pro X apart from the competition?

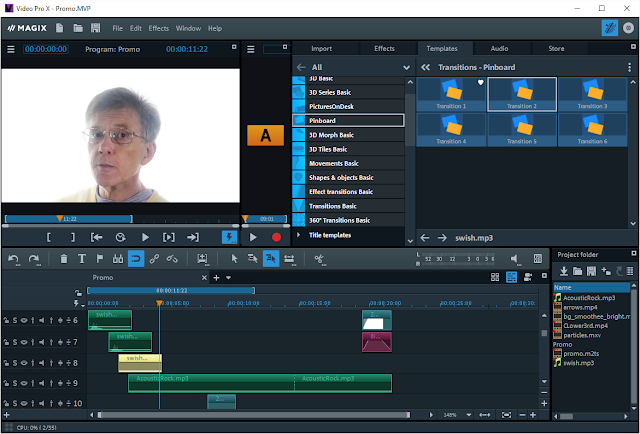
Video Pro X 10 is a good all-round video recording and editing package. You can see its multi-track timeline (below), video preview (top left) and tabbed panel of effects, templates and transitions (top right).
Well, for one thing it has a neat, easy-to-use environment. You can preview the video in two screen simultaneously so if you apply effects you can easily compare the clip ‘before’ and ‘after’. It has a good range of colour grading and ‘shot matching’ capabilities to let you change or regularise the colour temperature across one or more clips. It has a built-in audio editor to let you improve audio, remove background hiss and so on. It can auto-align multiple video and audio clips so that audio is synchronized (if, for example, you are editing video recorded simultaneously by two cameras). It even comes with a fairly powerful screen recording tool so that you can make screencasts with or without camera-recorded video overlays. In short, it has a range of features that make it suitable for most common video editing tasks, with a relatively low learning curve and at a modest price. See my reviews of the previous two releases: Video Pro X 2017 and Video Pro X 8 for more details.

Now let’s consider the new additions. One of the big improvements is the speed of producing finished videos. By making use of the NVIDIA graphic cards’ encoding hardware, Video Pro X says that it now exports videos at speeds “which were inconceivable in the past”. Other optimisations have been made to boost image processing speeds and 4K output quality.

If you are using a 360 degree camera, you will also be able to take advantage of new and improved features such as 360 degree image stabilisation and transitions. These are supplied via the include 3rd party add-in from HitFilm.

Another new feature is the grouping of J-L cuts (a technique for synchronizing video and audio across clips). User interface improvements have been made too.  For example, the effects panel has been redesigned (with lots of little grouped icons) to make it easier to find effects quickly.

What’s New?


Let’s start with the J-L Cut grouping. J-L Cut is a term that describes the ability to cut from one bit of video to another while keeping the audio track synchronized. For example, Person One is talking then you cut to show Person Two’s reaction you may want to keep Person One’s voice playing across both video clips, That’s an L Cut. On the other hand, if you Show Person Two’s face while we hear Person One’s voice, then switch to show Person One speaking, that’s a J-Cut. The names J and L refer (very roughly) to the shapes made by the clips on the timeline when you make these sort of edits.

When audio has been recorded ‘into’ a video clip you can either edit the video+audio on a single track or you can separate them so that they are shown on separate tracks, one above the other. In normal editing mode, when you drag the start or end edges of the video track, the edges of its associated audio track move too. With the J-L editing mode, you just hold down the ALT key so that when you drag the video clip, the audio track is unaffected. The audio remains synchronized with the video but the video itself can be easily cut to allow other video clips to be added over the audio track. While this sort of thing can be done in the standard editing mode, it is much faster and simpler using the dedicated J-L editing mode.

Another handy editing addition is the ‘move object contents’ mode. This lets you retain the clip’s length and position in the timeline but use the mouse to scroll to a different starting point of the clip. In other words, assuming you already have a 5 second clip (editing from a 60 second piece of video) of someone catching a ball but now you decide that you’d really prefer to have used a slightly later portion of the video clip showing the person throwing the ball. Usually this would mean that you would need to do quite a bit of re-editing to cut out a different bit of the clip and substitute it for the one currently in use. With the ‘move object contents’ mode however, you can leave your 5 second clip right where it is and use the mouse to scroll to a different part of the 60-second video, making the actual editing process very simple and quick.

The Chroma Key feature has also been improved in this release. This lets you select a small background area in a video clip and then automatically remove that colour from the clip. This is typically used with green or blue-screen backdrops to allow the video-maker to ‘cut out’ the speaker or actors from the foreground and then completely replace the background. Chroma Keying is routinely used in TV shows and movies to create composites in which separately shot foreground action is seamlessly placed into a background. Chroma Keying can be quite difficult to get right, however. Often the Chroma key leaves a green fringe around the foreground talent, or the edges may be raggedy. This can be particularly problematic when you are shooting in a small space, with the backdrop quite close to the actor (so some colour spill occurs) or when you are unable to light the backdrop sufficiently well to ensure a pure and consistent colour throughout. In such conditions, it may be hard to remove all the background without also removing some of the foreground. As long as your backdrop is very evenly illuminated, Video Pro X does a good job of background removal using sliders to make manual adjustments including ‘antispill’ (green fringe) removal.


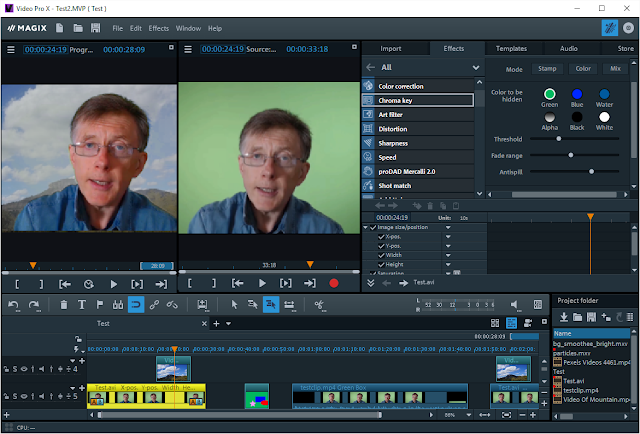
Chroma Key lets you remove a background colour (the green here) so that you can substitute a different background image or video. It can be effective with really good green-screen lighting. But it’s hard to get a good Chroma Key effect when the green screen lighting is imperfect.

The Chroma Key sliders can be quite sluggish, however. Often they just don’t move at all or only move jerkily when I drag them. The problem could, in any case, be avoided if numeric input (percentage values) were provided as an alternative to the sliders. The other deficiency of Video Pro X Chroma Key is that it is a bit unforgiving when working with unevenly illuminated backdrops. As a lone video-maker, I rarely have the time or the space to set up a perfectly lit green screen. With imperfectly lit backdrops, getting a good key in Video Pro X is quite tricky. Some packages (such as the low-cost Movavi Video Suite) cope much better with imperfectly illuminated backdrops.

Speed


Finally, it’s worth mentioning the speed improvements when rendering the final movie. Video Pro X 10 can take advantage of the hardware capabilities of modern NVIDIA graphics cards to increase the rendering speed when exporting movies using the HEVC/H.265 MP4 format. This is said to be “the biggest leap in Video Pro X performance in years.”

I did a test render of a short project (2 minutes, 11 seconds in length) at 25fps and a resolution of 1920x1088. The project comprising several video clips and transitions and was rendered on an i7 CPU @ 3.30GHz, 16Mb RAM with an NVIDIA GeForce GTX 980 Ti with 6Gb graphics card.

The results were that it rendered MPEG in 3m36s with a file size of 459,674 and it rendered HEVC in 2m15s with a file size of 133,349. So clearly in terms of both exporting time and file size, the HEVC rendering is substantially better than MPEG. The relative improvements will, of course, be much more noticeable with bigger projects.

Video Pro X 10 can export movies in a number of different formats and a PC with a modern NVIDIA graphics card can take advantage of accelerated rendering speeds.

Now, benchmarks like this should be taken as only a very rough guide to actual performance. The results may vary considerably due to factors such as the complexity of the project (the media that’s included, the range of transitions and effects) as well as the exporting options selected. For comparison, I tried HEVC exporting a longer but much simpler project. This comprised a single 6m32s video clip with no effects or transitions at 1920x1088 and 30fps. The render time for this was just 1m38s. In other words, pretty damn’ fast. Even so, it was outperformed by Cyberlink PowerDirector 16 which rendered the same clip with the same settings, also using hardware video encoding, in exactly one minute. In fact, when I changed to my usual PowerDirector render settings (H.264 AVC/MP4, 1920x1080, 30fps using hardware video encoding) it rendered the movie in just 49 seconds. On the whole, it seems to me that PowerDirector still has the fastest video rendering of any package that I am aware of. Even so the hardware-accelerated speeds achieved by Video Pro X are good – significantly faster than many other video editing packages.

Conclusion


So, in conclusion, how good is Video Pro X 10? My view is that it is pretty damn’ good. I could certainly imagine using it for all my own video editing projects. Its speed, ease of use and its excellent range of editing and rendering features make it an accessible and powerful editing suite. That said, I’m not entirely sure why it is said to be the “largest update for Video Pro X ever”. Welcome though the additions and enhancements are, the range of improvements  is not quite as extensive as I had been expecting based on the company’s marketing claims. The interactive clip-editing and rendering speed optimizations are the two things that stand out for me. It’s a pity, though, that the Chroma Keying is not more able to deal, more easily and quickly, with less than perfect backdrop illumination.

Overall, MAGIX Video Pro X 10 is a solid, capable, well-featured program for recording, editing and producing good quality video. In spite of a few criticisms, my view is that this is an impressive pro-grade all-rounder at a reasonable price.

Tuesday 10 July 2018

Paragon Backup & Recovery Free

Paragon Backup & Recovery Free is a newly-released PC backup and recovery tool from backup specialists, Paragon Software.

Key features:

  • Disk Backup – Save not only disk data but also system service structures
  • Differential Backup – Save backup storage space by archiving only what’s changed since the last full sector-based image
  • Incremental Backup – Back up modified data along with a full sector-based archive
  • Flexible Restore (in WinPE) – Restore an entire disk, separate partitions, or only the files you need from previous backup images
  • Recovery Media – Create a bootable USB Flash drive, CD, or DVD to recover your PC on demand
  • Easy Recalibration – Restore contents of a 512-byte hard disk to a 4K hard disk with no additional input from your side
  • WinPE-based Recovery Environment – Create a full-fledged Windows-based recovery environment stored on bootable media.

For more advanced data management functionality, the company offers Paragon Hard Disk Manager for Windows– an all-in-one data management tool combining the backup, recovery, partition management, data migration and data wiping technologies.

Paragon Backup & Recovery Free is available to home users at no cost at https://www.paragon-software.com/free/br-free/

Wednesday 4 July 2018

Camtasia 2018 Review

Camtasia 2018 $249

(upgrade $99.50)

https://www.techsmith.com/

Camtasia is one of the best-known and best-liked screencasting programs for Windows and Mac. It gives you the ability to make video recordings from your computer monitor and edit them on a multi-track timeline. I reviewed the last major version of Camtasia (version 9) back in 2016. The new release, Camtasia 2018, adds on some new features and optimises some existing features. So let’s see what’s changed…

That’s Camtasia 9 in the background (top-left) and Camtasia 2018 in the foreground. At first sight, nothing much seems to have changed. You need to look more closely to spot the differences… 
One of the big changes, according to Techsmith, is the improved Library. The Library is a panel where you can store reusable assets – video and audio clips, backgrounds, animated objects, intros and outros and so forth. In Camtasia 9, the Library shared a tabbed panel with the Media clip panel. In Camtasia 2018 it’s been given its own panel with a few extra capabilities. For example, you can now have multiple named libraries, you can manage assets by moving selected elements from one named library to another, you can enter text to search for an asset and you can automatically import libraries from Camtasia 9.1. Well, up to a point. I found that the Library importer failed with my Camtasia 9.1 Library. It also failed when I explicitly exported the 9.1 Library and then attempted to import it. I got around this problem by selecting portions of the old Library, exporting those to a Library zip file and then importing them.

The Library now has its own dedicated panel (show at the left) and it it includes various assets such as the animated background that is being previewed here.
Some additional assets are provided with this release. And if you need even more pre-designed intros, outros, backgrounds and music clips you can buy access to 600,000 additional royalty-free assets for $199 a year.

User-defined theming is another new feature. This lets you define the colours and fonts to be used for elements such as text and speech-bubbles. Then, when you add an element to the timeline you can select a theme from the properties panel to apply the preset fonts and colours to it. There is no way to set a default theme, however – one that atomically applies settings to elements as they are used. There is a theme called ‘Default’ but even that has to be applied on an element-by-element basis.

Themes let you define colours and fonts so that they can be applied quickly to text and callouts
There are a few technical improvements and optimizations too. There is an option to render at a higher frame-rate than before. Camtasia 2018 supports up to 60 fps (frames per second) whereas the maximum for Camtasia 9 was 30 fps. The rendering efficiency has also been improved with Techsmith claiming a speed improvement of up to 50%.

Camtasia 2018 can render at up to 60fps. Previously 30fps was the maximum.
Naturally, Camtasia 2018 retains the features from its previous release. If you are not familiar with Camtasia, let me summarise briefly. The software includes a screen-capture tool that lets you grab images of your entire screen or a screen from a selected monitor, it can lock onto a single window or it can record a user selected rectangle on screen. It can simultaneously record from a webcam so you can overlay the screen recording with a ‘talking head’ video. It includes transitions to join together clips using blurs, fades and so on. It has ‘behaviours’ to let you add bouncing and sliding movements to clips or text. It has annotation tools to add highlights, boxes, arrows and speech bubbles. And it has a small but useful range of video and audio enhancement tools to remove background hums from audio, colours from video (for Chroma key/green screen effects) and so forth. For a more extensive overview see my reviews of Camtasia 9 and Camtasia 8.

I recorded myself in front of a green screen. By using the ‘remove a colour’ (Chroma key) option I was able to remove the background. This is not a sophisticated Chrome key tool but for ‘talking head’ screencasts it does the job quickly and pretty efficiently.

Final Thoughts…

So it’s been a two-year wait for this new edition on Camtasia. Has it been worth it? Well, I have to say that the software has changed very little since the previous release. The addition of 60 fps support is welcome and changes to the library and themes are also useful. But in all essentials Camtasia 2018 looks and feels just like the previous release. Arguably, of course, that is no bad thing. If something does a good job and users like the way it does it, why change it? Camtasia remains my preferred screencasting software on Windows. I also like the Mac version (especially its ability to swap recordings easily with the Windows version) though it has to be said that on the Mac, Camtasia faces stiff competition from Screenflow.

Even so, I am surprised that the existing features have not been expended to a greater degree. Why are there no extra transitions, video effects, audio effects, annotations and behaviours for example? If you already have Camtasia 9 and are wondering whether or not to upgrade, frankly, I would hesitate. Unless there is something among the new features that is a “must have” for your work, the $99 upgrade cost seems to me to be a bit steep for a product that has changed so little.

If, on the other hand, you are not an existing user and you considering buying a screencasting suite, well, in that case I would certainly recommend Camtasia. But bear in mind that Camtasia is a screencasting application that does ‘pure’ (camera-recorded) video editing as a bonus. If your main requirement is to create videos from camera recordings then you should invest in a general-purposes video editor such as PowerDirector. PowerDirector, and some other general-purpose video editing packages, also provide screen-recording capabilities. So if you don’t do much screen-recording a package such as PowerDirector might be a good all-rounder. But if screen-recording is your main requirement and you want a fast, simple and efficient package, Camtasia remains my first choice.

For more reviews of screencasting and video editing programs see here: http://www.bitwisemag.com/search/label/video