Saturday 15 December 2018

My False Identity (thanks to O2)

I just bought a new iPhone. I logged onto O2 and ordered a sim (the card that gets me a phone number and mobile identity). Suddenly I am someone else. I have another person’s email address and login ID. Some other person has potentially a network of contacts who all have my mobile phone number. Sounds like a subplot from “Mr Robot”? Nope, it just happened to me.

I tried to register to O2’s web site. They asked for my phone number. Then “for security” (oh, the irony!) they texted my a code to my phone. I went back online and entered the code. This is what I saw (the email address has been blurred to preserve the anonymity of the – I hope – innocent party identified here).


Yup, I really now have someone else’s email address and their mobile phone number (or anyway, a number that O2 still has registered to them). What wickedness I might get up to! I mean with that combination of information, who could doubt that I am somebody who I am, in fact, not? I’m just hoping that other person knows less about me than I know about them.

I phoned O2. An operative calmly told me that this was standard practice and nothing to worry about. They just recycled another user’s phone number. So how come it is still registered to the other user? Oh, it could take up to six months to unregister. And I am supposed to use that phone number during that period? really? I asked to speak to his manager.

His manager proved to be much more concerned by this situation. She agreed with me that it was not only inconvenient but that the security implications were far from trivial. She advised me not to use the sim. I had already arrived at that conclusion myself.

I have to say that I remain gobsmacked. This has now been logged as a formal complaint and I am waiting for a response from the complaints department at O2.

In the meantime, anyone want to buy a fake identity?

Wednesday 7 November 2018

PowerDirector 17 Review


Cyberlink PowerDirector 17 Ultra £79.99
https://www.cyberlink.com/products/powerdirector-video-editing-software/features_en_GB.html

PowerDirector is my number one choice of video editing packages on Windows for serious video makers on a tight budget. If that’s all you need to know, skip the rest of the review and go and buy it. But, while I am generally enthusiastic about this product, there are also things I don’t like about it. So if you want a more balanced overview, read on.


For those of you who are unfamiliar with PowerDirector, let me begin with a brief overview. This is a video-editing package that lets you import video and audio clips and edit them on multiple tracks arranged on a horizontal timeline. You can cut, copy and move clips. You can apply ‘transitions’ to fade one clip into another with optional effects such as wipes, dissolves and so forth. You can change the colours of video clips, make them look like old black and white films or cartoons and apply a whole batch of other snazzy effects. Once you’ve finished editing, you can produce the final video in a range of common formats. One of the most striking features of PowerDirector is its production speed. In my experience, it can render videos significantly more rapidly than any other video editing package I’ve used. For a more in-depth look at its core features, refer to my reviews of previous versions: PowerDirector 16 and PowerDirector 15.

OK, but what’s new in this latest release?

New Features

One of the most useful improvements is the integrated audio editing. In previous releases, if you wanted to do anything more than very basic edition editing (cutting, volume control and son on) you were obliged to launch the audio clip into a separate Wave Editor program, or another audio editor of your choosing. Now PowerDirector 17 now pretty decent audio editing capabilities in a popup editor window. This includes effects such as Reverb, Pitch-shift and Noise reduction.

The integrated audio editor gives you quick access to audio cleanup and effects options
Chroma Key (‘green screen’) has been improved too.  Most video editors provide some kind of Chroma Key facility to remove plain background colours and substitute an image or video into the background – but often this only works well if you have an absolutely perfectly illuminated green screen. Many of us do green-screening in our offices, studios or bedrooms, with very imperfect lighting. Getting a good ‘key’ in these circumstances can be difficult, resulting in jagged edges and green fringes around the foreground performer. The previous version of PowerDirector did a reasonable job of dealing with badly-lit backdrops. The new version goes further by letting you select up to three ‘samples’ from the background to improve the accuracy of colour removal. This can be a bit tricky to use, however, because once one key has been applied, most of the background disappears, making it hard to select a second key. It would be better if each of the three keys could be toggled on and off to make selection of the remaining keys easier.

Here I’ve selected two different shades of green in the left pane to remove different portions of my green background
If, like me, you often create small projects – with each project forming a single ‘scene’ of a larger video – one of the annoying things you will come across is the problem of integrating your smaller projects into the bigger one. PowerDirector 17 has added a ‘nested project’ feature to deal with that. Now you can import other PowerDirector projects into the project you are currently editing. The imported project can then be dragged as a single unit onto the timeline. It can also be edited in its own tabbed timeline area. This is an extremely useful new feature.

Here you can see the main project ‘Promo’ on the left tab with two nested projects shown in tabs to its right
You can also ‘precut’ video clips prior to placing them onto the timeline. Let me explain. Imagine that you’ve imported a two minute clip but you only want to use 30 seconds of it. In previous releases, you would have to import the clip to the Library (the storage pane for your media) and drop the entire two minute clip onto the timeline before trimming it to size. Now you can trim the clip in a popup editor and store the trimmed clip in the Library. Then you can add the trimmed clip to the timeline when needed. This may seem a trivial difference but when editing complex projects it is a real benefit.

Many other features have been improved in this release. These include speed improvements, support for more video formats and codecs, additional text effects such as neon and fire, an enhanced ‘video collage’ designer to let you do split-screen effects with multiple clips, and an improved screen recorder.

The screen recorder tool is useful for anyone making screencast videos that show software being used: for example, if you are creating software tutorials or reviewing games. You can also include webcam video captured at the same time as the screen but this has the significant limitation that the webcam and screen-capture will be recorded together into a single video clip so you can’t subsequently edit the webcam video by moving and resizing it or applying Chroma Key. I queried this with Cyberlink and they provided a suggested ‘workaround’ which involves recording the webcam from the main PowerDirector workspace and then recording the screen separately using the screen-recorder tool. While this may work it is not exactly simple. Even an inexpensive video package such as Movavi Video Suite provides a better webcam/screencast recorder than that! And if you are doing regular screencasts, Camtasia remains my top recommendation.

In addition to the things mentioned above, PowerDirector also comes with a large range of effects and transitions, with excellent ‘colour matching’ capabilities, support for 360 degree videos, motion-tracking, multi-camera editing and auto-synchronization of clips by aligning sound wave patterns.
Hers is Cyberlink’s promo video, highlighting some of the software’s notable features…


Versions

Here I have been reviewing the Ultra Edition of PowerDirector 17. There is also an Ultimate Edition which includes additional plugins and effects (£99.99), plus a subscription edition which can be paid for monthly (from £5 per month). Refer to the PowerDirector Version Comparison for more information: https://www.cyberlink.com/products/powerdirector-video-editing-software/comparison_en_GB.html

Summary

This is another great release of PowerDirector. While it is priced towards the hobbyist end of the market, don’t be fooled into thinking it is for amateurs only. In fact, it now has an excellent range of pro-level features. For the serious video editor on a tight budget, PowerDirector is my top recommendation. And even serious video editors with a bigger budget would do well to check it out. Not only are both the feature set and ease of use good but also (and this is one thing that I really value) the speed of rendering is unparalleled. It’s a shame that the video size is not equally efficiently optimized (I use Handbrake to reduce the size before uploading big videos), but, well, I guess you can’t have everything!

Tuesday 6 November 2018

Programming Mega Deal

25+ Programming Courses and eBooks MEGA DEAL

I’ve got news of a massive deal on programming tutorials. It's called: The Ultimate Programmer Super Stack, and it comes courtesy of Cary Richards at Infostack.io.

The Ultimate Programmer Super Stack is a collection of 25+ premium ecourses, bestselling ebooks, and resources that will help programmers:

Learn a wide range of today’s most popular (and lucrative) languages and frameworks, including everything from Python, Java, JavaScript, and Ruby, to HTML, CSS, and Kotlin…

Discover how to build APIs, websites, and iOS and Android applications from scratch
Master the soft skills you need to become ‘Coder Complete’


This great value bundles also includes one of my own courses: “Break Into The Programming Business” which gives you a quick overview of the programming languages, jargon and technologies that you need to understand when you move into the professional world of software development.

If you bought all the courses in this bundle one by one, it would cost you over $1,300. This deal lets you buy all the courses for a single payment of just $47.95, which is tremendous value.
To get this bundle, sign up here:

https://bitwise--infostack.thrivecart.com/up

Programming C: Strings and Character Pointers

The most important thing to know about the string data-type in C is that there isn’t one! Many other languages such as Java, C# and Pascal have a string type which lets you create variables to which string literals such as “Hello world” may be assigned.

In C, you can create  and initialize a string like this:

char str1[] = "Hello";

A string is always terminated by a null '\0' character. It turns out that when you initialize a string at the time of its declaration, as in the example above, a null terminator is added automatically. The first null terminator found in a string will be treated as the end of that string. So, given this declaration:

char str2[] = "Goodbye\0 world";

When I display str2 with printf, like this:

printf("%s\n", str2);

This is what is displayed (because the string terminates on the '\0' character):

Goodbye

In C, I can declare and initialize strings either by placing a pair of square brackets after an identifier or by preceding the identifier with an asterisk (or ‘star’) like this:

char str1[] = "Hello";
char *str2 = "Goodbye";

At first sight, these two declarations appear to be more or less equivalent. Each is initialized with a string and I can display that string using printf like this:

printf("%s\n",  str1);
printf("%s\n",  str2);

In fact, the apparent similarity is deceptive. In order to understand why, we now have to get to grips with one of the most challenging aspects of the C language – pointers.

Pointers...

In the example above, the asterisk or ‘star’ (*) indicates that the variable str2 is a pointer to some memory location. In this case, this happens to be the memory location where the array of characters forming the string “Goodbye” is stored. Each piece of data in your computer’s memory is stored at some memory location or ‘address’. You can display that address using the ‘address-of’ operator & placed before a variable name. This is how I would display the addresses of str1 and str2 (note: it is normal to use the %p format specifier to print an address as a hexadecimal value. Many programmers find hexadecimal hard to understand, however, so in this example I use %d to print an address as a decimal value):

printf("%d\n", &str1);
printf("%d\n", &str2);

If you ran this code, it would display some numbers such as:

2686746
2686740

These are the addresses – that is, the positions in your computer’s memory where these variables live. Now that we have the addresses of the variables, let’s take a look at their values – the data which they store. Here I will print out the address of each variable followed by its value shown first as an integer (%d) and then as a string (%s):

char str1[] = "Hello";
char *str2 = "Goodbye";
printf("%d %d %s\n", &str1, str1, str1);
printf("%d %d %s\n", &str2, str2, str2);

And this is what is displayed (though the actual numbers may vary):

2686746 2686746 Hello
2686740 4206628 Goodbye

This tells me that the address of str1 is 2686746 and its value expressed as an integer is the same number 2686746. Its value expressed as a string is the string with which it was initialized, “Hello”.
The address of str2 is 2686740 but its value expressed as an integer is a different number 4206628. Its value expressed as a string is the string with which it was initialized, “Goodbye”.
The important thing to observe here is that the value of the array name, str1 when expressed as an integer is the same as the address of that name. In fact, we can say that:

THE VALUE OF AN ARRAY NAME IS THE ADDRESS OF THE START OF THAT ARRAY.

I’ll have more to say about arrays, pointers and addresses in a future lesson.

NOTE: If you are new to C, you may want to start with lesson 1 in this series: http://www.bitwisemag.com/2017/02/introduction-to-c-programming.html
And if you want to learn C in more depth, why not sign up to my online video course – C Programming for beginners. See here: http://www.bitwisemag.com/2017/01/learn-to-program-c-special-deal.html

Monday 22 October 2018

Logical Operators in C

This is another lesson in C for programmers who are new to the language. Here I want to summarise logical operators which you can use to test if some condition is true or false.

The && operator means ‘and’ and the || operator means ‘or’. These are called ‘logical operators’. Logical operators can help you chain together conditions when you want to take some action only when all of a set of conditions are true or when any one of a set of conditions is true. For example, you might want to offer a discount to customers only when they have bought goods worth more than 100 dollars and they have also bought the deal of the day. In code these conditions could be evaluated using the logical and (&&) operator, like this:

 if ((valueOfPurchases > 100) && (boughtDealOfTheDay))

But if you are feeling more generous, you might want to offer a discount either if a customer has bought goods worth more than 100 dollars or has bought the deal of the day. In code these conditions can be evaluated using the logical or (||) operator, like this:

 if ((valueOfPurchases > 100) || (boughtDealOfTheDay))

Logical operators test Boolean values. A Boolean value can either be true or it can be false. Some programming languages have a special Boolean data type. C does not. In C, any non-zero value such as 1 or 100 is evaluated as true. A zero value is evaluated as false.

It is possible to create quite complex conditions by chaining together tests with multiple && and || operators. Be careful, however. Complex tests are often hard to understand and if you make a mistake they may produce unwanted side effects. In addition, just as when you are using arithmetic operators, you may avoid ambiguity by grouping the individual ‘test conditions’ between parentheses.

The ! operator can be used to negate a condition. So the test !( a == b) (‘not a equals b’) is equivalent to (a != b) (‘a is not equal to b’). Similarly this test…

 (number_of_children != 0)

…could be rewritten like this:

!(number_of_children == 0)

NOTE: If you are new to C, you may want to start with lesson 1 in this series: http://www.bitwisemag.com/2017/02/introduction-to-c-programming.html
And if you want to learn C in more depth, why not sign up to my online video course – C Programming for beginners. See here: http://www.bitwisemag.com/2017/01/learn-to-program-c-special-deal.html

Monday 24 September 2018

Recursion For Programmers


Recursion is a powerful programming technique. A function that calls itself recursively not only saves programming effort and avoids repetition but it can also be used to navigate complex structures such as Trees and Class Hierarchies. But recursion can also be quite hard to understand.

I recently published a course that explains recursion from the ground up. The full price is $45. But if you use the link below you can sign up for just $12! (Local taxes or EU VAT may be applied)
https://bitwisecourses.com/p/recursion-for-programmers/?product_id=778235&coupon_code=BWRECURSIONDEAL

I’ve tried to explain recursion in depth in this course. Along the way, I also explain some important details of the computer architecture. You need to understand the stack, stack frames, variable scope and a few other details in order to get a good understanding of recursion.


I strongly advise you to try to write our own recursive functions as you progress through the course. My examples are all in C, Ruby or C#. But you can write recursive functions in whichever language you happen to be using. In fact, it would be a good exercise to try to translate my examples into another languages – Python, Java, Basic or Pascal, for example.

The courses includes numerous short sample programs to show how recursion works. There are samples written in C, Ruby and C#. However, you don’t need to program in those languages to follow this course. Recursion works the same way in all mainstream programming languages. This course explains the theory and the practice of recursion. You can use the techniques that are taught to write recursive functions in whichever language you prefer: C, C#, Java, JavaScript, Python, Basic, Pascal and others. The course is not about any specific language.

This is what you will learn…
  • What is recursion?
  • How variables are scoped in recursive functions
  • How recursive functions return values
  • The Stack and Stack Frames
  • Debugging recursive functions
  • Recursion v Iteration
  • Stack Corruption, and how to avoid it
  • Infinite Recursion, and how to avoid it
  • Recursing Fibonacci Numbers
  • Recursing a Class Hierarchy
  • Trees and recursion
  • Navigating subdirectories recursively
Here are two sample lessons from the course…


Sign up before the end of October 2018 to get this course at a 73% Discount...
https://bitwisecourses.com/p/recursion-for-programmers/?product_id=778235&coupon_code=BWRECURSIONDEAL

Monday 17 September 2018

Vegas 16 Edit Review

VEGAS PRO 16 Edit £299
https://www.vegascreativesoftware.com

VEGAS is a powerful video editing package which has been given a new lease of life since its acquisition by MAGIX Software in 2016. In fact, VEGAS 16 is the third major release in just two years.

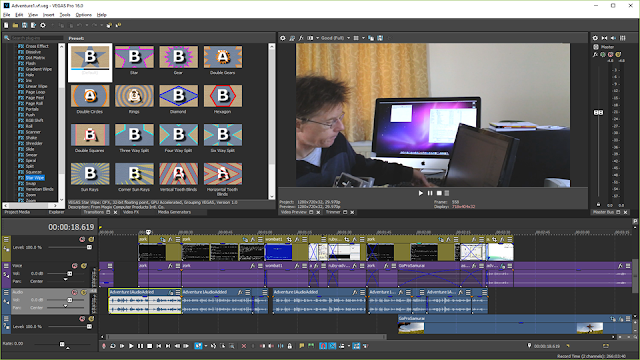
VEGAS Pro 16 - a powerful package, though it takes a while to learn
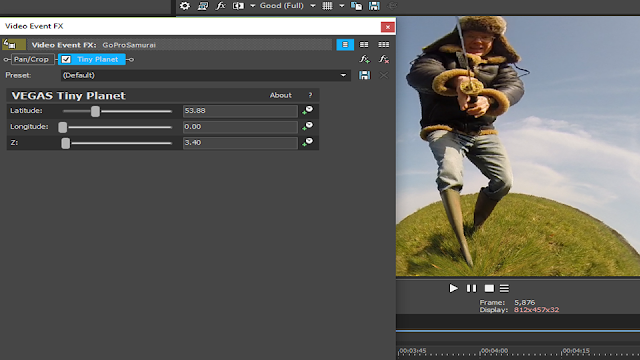
New features include improved video stabilization and motion tracking, 360-degree video support (assuming you have a suitable 360-degree camera!), a ‘tiny planet’ plugin that distorts a video using an extreme fisheye effect to make it appear that the ground-plane forms a planet-like sphere, plus various user interface improvements.

Using 'tiny planet' I've transformed an ordinary field into a little world!
Plugins and effects can be ‘chained together’ by adding one plugin after another. The advantage of this approach is that you can selectively tweak numerous different parameters for each effect to give you precise and accurate control over each of them. The disadvantage is that this process can be time-consuming and confusing. For example, it may be entirely possible to remove background noise from a track using the Audio Restoration and NoiseGate effects (plus others) but working out how to do so can be baffling. Personally, I find it simpler to process audio tracks using some other tool such as the free Audacity audio editor or MAGIX’s own SoundForge program.

Here I've made a selection so that I can 'track' a person's movements
Video Effects can be similarly non-obvious. For example, to apply Motion Tracking you need to use a tool called ‘Bezier Masking’, then draw out a selection box over an object, expand a ‘Mask’ option in a dialog and finally click a button to track the object. If I hadn’t seen the MAGIX tutorial on this, I can honestly say I’d never have guessed that this was how to do it.

The newly enhanced Motion Tracking feature includes the ability to select objects (such as a person or vehicle) and automatically track their motion as the video plays. Masks and effects (blurs, contrast/brightness and so on) or text annotations can be added to the tracked objects to follow their movements. A very useful tool.

It’s worth saying that VEGAS has pretty much all the features you would expect from a pro-level video editing package: the ability to cut, trim, copy and move clips over numerous tracks in the timeline; a large range of transitions and effects; zoom, pan, add titles and so on.
For a more detailed overview of the code features of VEGAS, see my reviews of VEGAS Pro 15 and VEGAS Pro Edit 14

For those of you who use storyboards (a view of clips arranged either as lists or as sets of thumbnails arranged in lines like the rows of a spreadsheet) the new interactive storyboarding options will no doubt be welcome. This lets you make edits to the storyboard clips (e.g. changing the start and end points) or in the timeline (e.g. moving a clip to a new position) and the changes are synchronized in both the storyboard and timeline. 

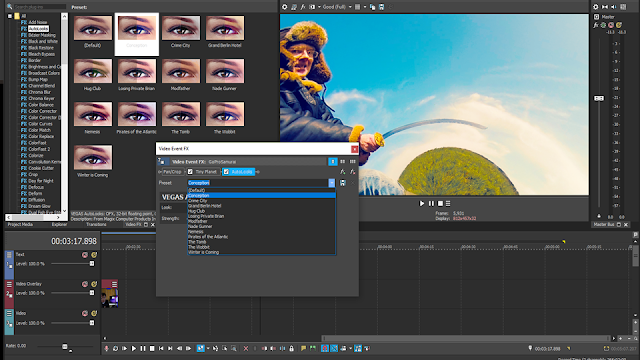
If you want to change the colour temperatures and densities to emulate some Hollywood films, you can use the new Autolooks filter. The names of the preset options (‘Losing Private Brian’, ‘Nade Gunner’, ‘The Wobbit’ etc. may give you a few clues as to the sort of look these try to achieve).

Autolooks lets you change the colours instantly (no, the sky wasn't really that colour!)
At a more mundane level, the file saving options have been improved so that your projects and backups can now be auto-saved at user-selected locations at timed intervals or after every editing change.  For a more detailed overview of new features, including demo videos, see here: https://www.vegascreativesoftware.com/gb/vegas-pro/new-features/#productMenu

Overall this is a good new release of VEGAS Pro. It incorporates a range of useful improvements without sacrificing the familiar workflow of previous releases. Bear in mind, however, that while VEGAS is a powerful package, it is not the easiest video editor for a complete newcomer. But for serious video editing at a modest price, VEGAS Pro 16 is a damn’ good choice.

NOTE: Vegas Pro 16 is available in several editions which include additional features, at higher prices. See the product comparison table here: https://www.vegascreativesoftware.com/gb/vegas-pro/product-comparison/#productMenu For my reviews of other video editing packages, see HERE.

Wednesday 18 July 2018

I Know Your Password - now let me blackmail you!

I know XXXXXXXX one of your password. Lets get right to purpose. You may not know me and you are probably wondering why you're getting this e-mail? No one has paid me to investigate about you.
I just received an email that started with the above text. Actually, the email was put into my Spam bin but I was browsing through when I noticed that the email header was quoting a genuine password that I have used in the past. "That's odd," I thought. So I read on. This is how the email continued...
In fact, I actually setup a software on the adult streaming (sex sites) website and there's more, you visited this web site to experience fun (you know what I mean). While you were viewing video clips, your browser started functioning as a Remote control Desktop that has a keylogger which gave me access to your display screen and web cam. 
Immediately after that, my software obtained all of your contacts from your Messenger, FB, as well as e-mail . After that I created a double-screen video. 1st part displays the video you were watching (you've got a nice taste rofl), and next part displays the recording of your webcam, & its u.  
You actually have 2 possibilities. Lets go through these possibilities in particulars:
First alternative is to just ignore this email. In that case, I most certainly will send your recorded material to every one of your contacts and thus consider regarding the disgrace you will definitely get. Not to mention if you are in a loving relationship, just how it will eventually affect? 
In the second place option would be to compensate me $3500. Lets name it as a donation. In this scenario, I most certainly will without delay erase your videotape. You can continue on everyday life like this never occurred and you surely will never hear back again from me.
You will make the payment through Bitcoin (if you don't know this, search for "how to buy bitcoin" in Google).
BTC Address to send to: XXXXXXX
[CASE SENSITIVE copy & paste it] 
In case you are looking at going to the authorities, surely, this e mail cannot be traced back to me. I have taken care of my actions. I am not looking to ask you for money a lot, I want to be paid for. I've a specific pixel in this e mail, and right now I know that you have read through this email message. You have one day to make the payment. If I do not receive the BitCoins, I will, no doubt send out your video to all of your contacts including family members, co-workers, and so on. Nonetheless, if I receive the payment, I will erase the video immidiately. If you want proof, reply with Yeah! and I will certainly send your video recording to your 5 contacts. This is the non-negotiable offer, that being said do not waste my personal time and yours by replying to this email.
OK, so this is a scam but it's a pretty interesting and deceptive one as it relies upon the receiver having more technical literacy than many simpler ("I'm a Nigerian prince, I want to send you money") scams. It assumes a) that you recognise your own password and know that other people should not have access to it and b) that you know what a keylogger is (it records and sends back to the bad guys the keystrokes you enter on your computer). It also assumes you understand Bitcoin and may at least be sufficiently baffled by the "hidden pixel" guff to think it's genuine.

OK, so I tracked down the password it mailed me. I had used it once, many years ago, when logging into a very innocent-looking site all about foreign language learning. The chances that a keylogger recorded my password all those years ago and the bad guys have only now decided to blackmail me seemed remote. Much more likely that the security of that site has been compromised, the bad guys got a whole load of old passwords and the rest of the email is pure nonsense.

Sunday 15 July 2018

MAGIX VideoPro X 10 – review

https://www.magix.com/us/video/video-pro-x/ $399 / £299

According to MAGIX, “On the occasion of the software’s 10 year anniversary, MAGIX Software is introducing the largest update for Video Pro X ever to the market.” Well, let’s see if the software lives up to that claim…

Video Pro X is a Windows video editing package that lets you create movies from multiple video and audio clips. You just add the clips to tracks on a timeline, cut, trim, move and edit the clips, add effects and transitions if required, then export in a variety of video formats. There are, of course, lots of other video packages that do his. So what sets Video Pro X apart from the competition?
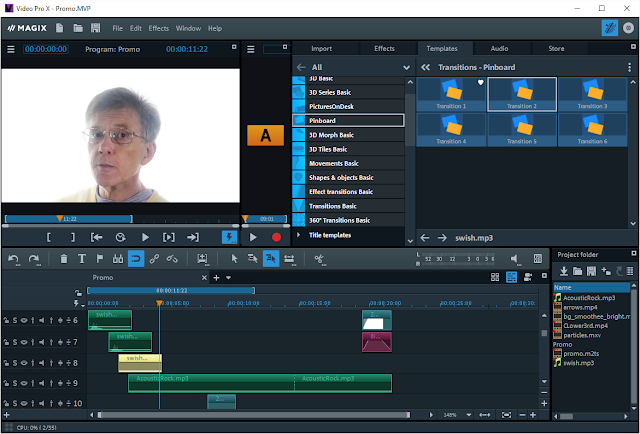
Video Pro X 10 is a good all-round video recording and editing package. You can see its multi-track timeline (below), video preview (top left) and tabbed panel of effects, templates and transitions (top right).
Well, for one thing it has a neat, easy-to-use environment. You can preview the video in two screen simultaneously so if you apply effects you can easily compare the clip ‘before’ and ‘after’. It has a good range of colour grading and ‘shot matching’ capabilities to let you change or regularise the colour temperature across one or more clips. It has a built-in audio editor to let you improve audio, remove background hiss and so on. It can auto-align multiple video and audio clips so that audio is synchronized (if, for example, you are editing video recorded simultaneously by two cameras). It even comes with a fairly powerful screen recording tool so that you can make screencasts with or without camera-recorded video overlays. In short, it has a range of features that make it suitable for most common video editing tasks, with a relatively low learning curve and at a modest price. See my reviews of the previous two releases: Video Pro X 2017 and Video Pro X 8 for more details.

Now let’s consider the new additions. One of the big improvements is the speed of producing finished videos. By making use of the NVIDIA graphic cards’ encoding hardware, Video Pro X says that it now exports videos at speeds “which were inconceivable in the past”. Other optimisations have been made to boost image processing speeds and 4K output quality.

If you are using a 360 degree camera, you will also be able to take advantage of new and improved features such as 360 degree image stabilisation and transitions. These are supplied via the include 3rd party add-in from HitFilm.

Another new feature is the grouping of J-L cuts (a technique for synchronizing video and audio across clips). User interface improvements have been made too.  For example, the effects panel has been redesigned (with lots of little grouped icons) to make it easier to find effects quickly.

What’s New?


Let’s start with the J-L Cut grouping. J-L Cut is a term that describes the ability to cut from one bit of video to another while keeping the audio track synchronized. For example, Person One is talking then you cut to show Person Two’s reaction you may want to keep Person One’s voice playing across both video clips, That’s an L Cut. On the other hand, if you Show Person Two’s face while we hear Person One’s voice, then switch to show Person One speaking, that’s a J-Cut. The names J and L refer (very roughly) to the shapes made by the clips on the timeline when you make these sort of edits.

When audio has been recorded ‘into’ a video clip you can either edit the video+audio on a single track or you can separate them so that they are shown on separate tracks, one above the other. In normal editing mode, when you drag the start or end edges of the video track, the edges of its associated audio track move too. With the J-L editing mode, you just hold down the ALT key so that when you drag the video clip, the audio track is unaffected. The audio remains synchronized with the video but the video itself can be easily cut to allow other video clips to be added over the audio track. While this sort of thing can be done in the standard editing mode, it is much faster and simpler using the dedicated J-L editing mode.

Another handy editing addition is the ‘move object contents’ mode. This lets you retain the clip’s length and position in the timeline but use the mouse to scroll to a different starting point of the clip. In other words, assuming you already have a 5 second clip (editing from a 60 second piece of video) of someone catching a ball but now you decide that you’d really prefer to have used a slightly later portion of the video clip showing the person throwing the ball. Usually this would mean that you would need to do quite a bit of re-editing to cut out a different bit of the clip and substitute it for the one currently in use. With the ‘move object contents’ mode however, you can leave your 5 second clip right where it is and use the mouse to scroll to a different part of the 60-second video, making the actual editing process very simple and quick.

The Chroma Key feature has also been improved in this release. This lets you select a small background area in a video clip and then automatically remove that colour from the clip. This is typically used with green or blue-screen backdrops to allow the video-maker to ‘cut out’ the speaker or actors from the foreground and then completely replace the background. Chroma Keying is routinely used in TV shows and movies to create composites in which separately shot foreground action is seamlessly placed into a background. Chroma Keying can be quite difficult to get right, however. Often the Chroma key leaves a green fringe around the foreground talent, or the edges may be raggedy. This can be particularly problematic when you are shooting in a small space, with the backdrop quite close to the actor (so some colour spill occurs) or when you are unable to light the backdrop sufficiently well to ensure a pure and consistent colour throughout. In such conditions, it may be hard to remove all the background without also removing some of the foreground. As long as your backdrop is very evenly illuminated, Video Pro X does a good job of background removal using sliders to make manual adjustments including ‘antispill’ (green fringe) removal.
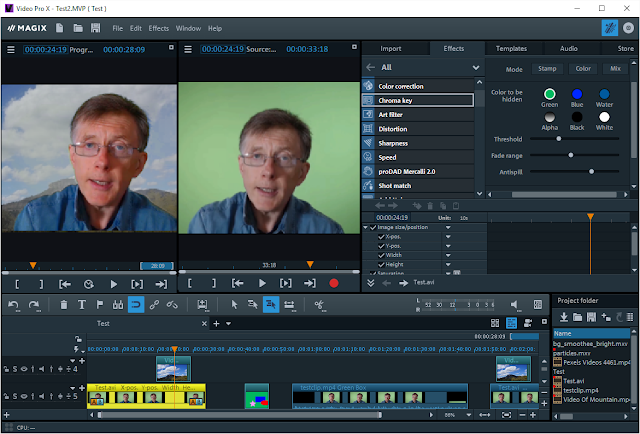


Chroma Key lets you remove a background colour (the green here) so that you can substitute a different background image or video. It can be effective with really good green-screen lighting. But it’s hard to get a good Chroma Key effect when the green screen lighting is imperfect.

The Chroma Key sliders can be quite sluggish, however. Often they just don’t move at all or only move jerkily when I drag them. The problem could, in any case, be avoided if numeric input (percentage values) were provided as an alternative to the sliders. The other deficiency of Video Pro X Chroma Key is that it is a bit unforgiving when working with unevenly illuminated backdrops. As a lone video-maker, I rarely have the time or the space to set up a perfectly lit green screen. With imperfectly lit backdrops, getting a good key in Video Pro X is quite tricky. Some packages (such as the low-cost Movavi Video Suite) cope much better with imperfectly illuminated backdrops.

Speed


Finally, it’s worth mentioning the speed improvements when rendering the final movie. Video Pro X 10 can take advantage of the hardware capabilities of modern NVIDIA graphics cards to increase the rendering speed when exporting movies using the HEVC/H.265 MP4 format. This is said to be “the biggest leap in Video Pro X performance in years.”

I did a test render of a short project (2 minutes, 11 seconds in length) at 25fps and a resolution of 1920x1088. The project comprising several video clips and transitions and was rendered on an i7 CPU @ 3.30GHz, 16Mb RAM with an NVIDIA GeForce GTX 980 Ti with 6Gb graphics card.

The results were that it rendered MPEG in 3m36s with a file size of 459,674 and it rendered HEVC in 2m15s with a file size of 133,349. So clearly in terms of both exporting time and file size, the HEVC rendering is substantially better than MPEG. The relative improvements will, of course, be much more noticeable with bigger projects.

Video Pro X 10 can export movies in a number of different formats and a PC with a modern NVIDIA graphics card can take advantage of accelerated rendering speeds.

Now, benchmarks like this should be taken as only a very rough guide to actual performance. The results may vary considerably due to factors such as the complexity of the project (the media that’s included, the range of transitions and effects) as well as the exporting options selected. For comparison, I tried HEVC exporting a longer but much simpler project. This comprised a single 6m32s video clip with no effects or transitions at 1920x1088 and 30fps. The render time for this was just 1m38s. In other words, pretty damn’ fast. Even so, it was outperformed by Cyberlink PowerDirector 16 which rendered the same clip with the same settings, also using hardware video encoding, in exactly one minute. In fact, when I changed to my usual PowerDirector render settings (H.264 AVC/MP4, 1920x1080, 30fps using hardware video encoding) it rendered the movie in just 49 seconds. On the whole, it seems to me that PowerDirector still has the fastest video rendering of any package that I am aware of. Even so the hardware-accelerated speeds achieved by Video Pro X are good – significantly faster than many other video editing packages.

Conclusion


So, in conclusion, how good is Video Pro X 10? My view is that it is pretty damn’ good. I could certainly imagine using it for all my own video editing projects. Its speed, ease of use and its excellent range of editing and rendering features make it an accessible and powerful editing suite. That said, I’m not entirely sure why it is said to be the “largest update for Video Pro X ever”. Welcome though the additions and enhancements are, the range of improvements  is not quite as extensive as I had been expecting based on the company’s marketing claims. The interactive clip-editing and rendering speed optimizations are the two things that stand out for me. It’s a pity, though, that the Chroma Keying is not more able to deal, more easily and quickly, with less than perfect backdrop illumination.

Overall, MAGIX Video Pro X 10 is a solid, capable, well-featured program for recording, editing and producing good quality video. In spite of a few criticisms, my view is that this is an impressive pro-grade all-rounder at a reasonable price.

Tuesday 10 July 2018

Paragon Backup & Recovery Free

Paragon Backup & Recovery Free is a newly-released PC backup and recovery tool from backup specialists, Paragon Software.

Key features:

  • Disk Backup – Save not only disk data but also system service structures
  • Differential Backup – Save backup storage space by archiving only what’s changed since the last full sector-based image
  • Incremental Backup – Back up modified data along with a full sector-based archive
  • Flexible Restore (in WinPE) – Restore an entire disk, separate partitions, or only the files you need from previous backup images
  • Recovery Media – Create a bootable USB Flash drive, CD, or DVD to recover your PC on demand
  • Easy Recalibration – Restore contents of a 512-byte hard disk to a 4K hard disk with no additional input from your side
  • WinPE-based Recovery Environment – Create a full-fledged Windows-based recovery environment stored on bootable media.

For more advanced data management functionality, the company offers Paragon Hard Disk Manager for Windows– an all-in-one data management tool combining the backup, recovery, partition management, data migration and data wiping technologies.

Paragon Backup & Recovery Free is available to home users at no cost at https://www.paragon-software.com/free/br-free/

Wednesday 4 July 2018

Camtasia 2018 Review

Camtasia 2018 $249

(upgrade $99.50)

https://www.techsmith.com/

Camtasia is one of the best-known and best-liked screencasting programs for Windows and Mac. It gives you the ability to make video recordings from your computer monitor and edit them on a multi-track timeline. I reviewed the last major version of Camtasia (version 9) back in 2016. The new release, Camtasia 2018, adds on some new features and optimises some existing features. So let’s see what’s changed…

That’s Camtasia 9 in the background (top-left) and Camtasia 2018 in the foreground. At first sight, nothing much seems to have changed. You need to look more closely to spot the differences… 
One of the big changes, according to Techsmith, is the improved Library. The Library is a panel where you can store reusable assets – video and audio clips, backgrounds, animated objects, intros and outros and so forth. In Camtasia 9, the Library shared a tabbed panel with the Media clip panel. In Camtasia 2018 it’s been given its own panel with a few extra capabilities. For example, you can now have multiple named libraries, you can manage assets by moving selected elements from one named library to another, you can enter text to search for an asset and you can automatically import libraries from Camtasia 9.1. Well, up to a point. I found that the Library importer failed with my Camtasia 9.1 Library. It also failed when I explicitly exported the 9.1 Library and then attempted to import it. I got around this problem by selecting portions of the old Library, exporting those to a Library zip file and then importing them.

The Library now has its own dedicated panel (show at the left) and it it includes various assets such as the animated background that is being previewed here.
Some additional assets are provided with this release. And if you need even more pre-designed intros, outros, backgrounds and music clips you can buy access to 600,000 additional royalty-free assets for $199 a year.

User-defined theming is another new feature. This lets you define the colours and fonts to be used for elements such as text and speech-bubbles. Then, when you add an element to the timeline you can select a theme from the properties panel to apply the preset fonts and colours to it. There is no way to set a default theme, however – one that atomically applies settings to elements as they are used. There is a theme called ‘Default’ but even that has to be applied on an element-by-element basis.

Themes let you define colours and fonts so that they can be applied quickly to text and callouts
There are a few technical improvements and optimizations too. There is an option to render at a higher frame-rate than before. Camtasia 2018 supports up to 60 fps (frames per second) whereas the maximum for Camtasia 9 was 30 fps. The rendering efficiency has also been improved with Techsmith claiming a speed improvement of up to 50%.

Camtasia 2018 can render at up to 60fps. Previously 30fps was the maximum.
Naturally, Camtasia 2018 retains the features from its previous release. If you are not familiar with Camtasia, let me summarise briefly. The software includes a screen-capture tool that lets you grab images of your entire screen or a screen from a selected monitor, it can lock onto a single window or it can record a user selected rectangle on screen. It can simultaneously record from a webcam so you can overlay the screen recording with a ‘talking head’ video. It includes transitions to join together clips using blurs, fades and so on. It has ‘behaviours’ to let you add bouncing and sliding movements to clips or text. It has annotation tools to add highlights, boxes, arrows and speech bubbles. And it has a small but useful range of video and audio enhancement tools to remove background hums from audio, colours from video (for Chroma key/green screen effects) and so forth. For a more extensive overview see my reviews of Camtasia 9 and Camtasia 8.

I recorded myself in front of a green screen. By using the ‘remove a colour’ (Chroma key) option I was able to remove the background. This is not a sophisticated Chrome key tool but for ‘talking head’ screencasts it does the job quickly and pretty efficiently.

Final Thoughts…

So it’s been a two-year wait for this new edition on Camtasia. Has it been worth it? Well, I have to say that the software has changed very little since the previous release. The addition of 60 fps support is welcome and changes to the library and themes are also useful. But in all essentials Camtasia 2018 looks and feels just like the previous release. Arguably, of course, that is no bad thing. If something does a good job and users like the way it does it, why change it? Camtasia remains my preferred screencasting software on Windows. I also like the Mac version (especially its ability to swap recordings easily with the Windows version) though it has to be said that on the Mac, Camtasia faces stiff competition from Screenflow.

Even so, I am surprised that the existing features have not been expended to a greater degree. Why are there no extra transitions, video effects, audio effects, annotations and behaviours for example? If you already have Camtasia 9 and are wondering whether or not to upgrade, frankly, I would hesitate. Unless there is something among the new features that is a “must have” for your work, the $99 upgrade cost seems to me to be a bit steep for a product that has changed so little.

If, on the other hand, you are not an existing user and you considering buying a screencasting suite, well, in that case I would certainly recommend Camtasia. But bear in mind that Camtasia is a screencasting application that does ‘pure’ (camera-recorded) video editing as a bonus. If your main requirement is to create videos from camera recordings then you should invest in a general-purposes video editor such as PowerDirector. PowerDirector, and some other general-purpose video editing packages, also provide screen-recording capabilities. So if you don’t do much screen-recording a package such as PowerDirector might be a good all-rounder. But if screen-recording is your main requirement and you want a fast, simple and efficient package, Camtasia remains my first choice.

For more reviews of screencasting and video editing programs see here: http://www.bitwisemag.com/search/label/video

Monday 18 June 2018

Able2Extract (PDF editor/converter) Review

Able2Extract Professional 12 $149.95
https://www.investintech.com/

PDF documents are everywhere these days. PDF documents provide a useful way of distributing files that retain all the formatting information from Microsoft Word, Excel or whatever other application you used to create the file. The problem with a PDF document is that once you’ve created it, it remains pretty much non-editable. Often that is what you want. But sometimes it can be a nuisance. For example, you may want to fix mistakes in a PDF document sent to your by a colleague. Or you may want to split a large PDF file into smaller individual documents. That’s where Able2Extract can help out.

Able2Extract can edit and convert large, complex documents including graphics and non-English (here Japanese) text
Able2Extract is a PDF editing and conversion tool. It lets you translate between PDF and multiple other common file formats. Conversion can be done in both directions – for example, you could convert from an Excel spreadsheet to PDF, edit it in Able2Extract, then save the resulting document to a Word file. Conversion can be done one document at a time or in batch mode on an entire directory of documents.

You can edit documents by adding and deleting text, adding graphics, redacting (blacking out passages) or adding annotation such as notes and strikethroughs. If you need create editable forms with interactive ‘fill-in’ fields you can do that too. There are limitations to the editing capabilities, however. If you expect to be able to edit text as you would in a word processor you will be disappointed. Editable text takes the form of pages, paragraphs, lines or parts of lines which can be edited within an area defined by a bounding box. Not only can the text inside the bounding box be edited but the entire box and its contents can be dragged and dropped to reposition it.

If you want to hide sensitive information from prying eyes you can ‘redact’ a document by replacing selected passages with black markers.
The actual areas defined by the bounding box are often unpredictable. In some documents, large blocks are editable, which is what you would expect. In other documents, seemingly arbitrary blocks are marked off as editable, and sometimes a single line of text is divided into several independently editable areas. Text edits ‘flow’ only within the confines of the bounding box, so you won’t get automatic word-wrap throughout an entire document as you would in a word processor.

This is the company’s official promo video

I’ve tested PDF import with a variety of different source documents and found that Able2Extract copes well even with documents containing Japanese text and mathematical formulae. Some characters, however, seem to vanish when a selection box is activated for editing. For example, in a mathematical expressions such as x(100) = 1 seem to vanish when the paragraph in which it appears is selected. I eventually discovered that this is because each part of the expression has its own selection box. So in the example above x has one box, (100) = 1 has another and the text of the paragraph in which it appears has yet another selection box. Obviously that makes the editing process rather tricky!

Here (above) I show the same part of a mathematical document with two different paragraphs selected. Note that some mathematical expressions (on the right) seem to ‘disappear’. This is due to the fact that they have their own selection boxes and so they do not appear within a selected paragraph.The conversion option is also a bit odd. You can’t just convert an entire document unless you first select all the text in that document. Selection before conversion makes sense if you want to convert only a selected block of text (and this is indeed an option) but it seems strange to insist that all the text be selected in advance of converting a whole document.
The Save As option is similarly restrictive. Sometimes I want to save a copy of a document before editing it, but the Save As option is only activated once editing changes have been made (otherwise it is greyed out).

There are, of course, numerous products available for viewing or editing PDF files (see Wikipedia for a list of some of them). If you just want to save from Word or Excel to PDF then the tools built into Microsoft Office are likely to be all you need. Some design and DTP applications also support PDF import (for example, the free LibreOffice suite imports editable PDF into its drawing application).

Adobe Acrobat, would once have been my first choice PDF editor. However, since Acrobat migrated to a subscription model costing around £13 a month for the basic version or £15 per month for the fully featured one, I am less enthusiastic. Personally, I hate subscription software. Even so, Acrobat is the ‘industry standard’ and if you don’t mind hiring it instead of buying it you can scan through the feature list here to see if it does everything you want: https://acrobat.adobe.com/uk/en/acrobat/pricing.html

If you prefer to buy a PDF editor outright, Able2Extract may appeal to you. Bear in mind though that you would need to verify that it provides the capabilities that you really need. To do that, I recommend downloading the trial edition before making a decision.

Wednesday 13 June 2018

C Programming for Beginners: Increment, Decrement, Prefix and Postfix Operators

This is part 5 of my series on C programming for beginners. (See also part 4)

When you want to increment or decrement by 1 (add 1 to, or subtract 1 from) the value of a variable, you may use the ++ and -- operators. Here is an example of the increment (++) operator:

int a;
a = 10;
a++; // a is now 11

This is an example of the decrement (--) operator:

int a;
a = 10;
a--; // a is now 9

PREFIX AND POSTFIX OPERATORS

You may place these operators either before or after a variable like this: a++ or ++a. When placed before a variable, the value is incremented before any assignment is made:

num1 = 10;
num2 = ++num1; // num2 = 11, num1 = 11

When placed after a variable, the assignment of the existing value is done before the variable’s value is incremented:

num1 = 10;
num2 = num1++; // num2 = 10, num1 = 11

As a general rule, I would recommend that you stick to using ++ and -- as postfix operators. In fact, there is often nothing wrong with using the longer form a = a + 1 or a = a – 1. Mixing prefix and postfix operators in your code can be confusing and may lead to hard-to-find bugs. So, whenever possible, keep it simple and keep it clear.

NOTE: If you are new to C, you may want to start with lesson 1 in this series: http://www.bitwisemag.com/2017/02/introduction-to-c-programming.html
And if you want to learn C in more depth, why not sign up to my online video course – C Programming for beginners. See here: http://www.bitwisemag.com/2017/01/learn-to-program-c-special-deal.html

Sunday 27 May 2018

ACID Pro 8 Review

https://www.magix.com/us/music/acid-pro/

ACID was the first loop-based audio arranging program I ever used. That was around twenty years ago. Oh, how time flies! Anyway, a lot has happened since then. For one thing, ACID which was developed by Sony has now been acquired by MAGIX software. For another thing, ACID now faces competition from a larger number of audio arranging programs ranging from the free such as LMMS   to the popular but fairly expensive Ableton Live  –  not forgetting another MAGIX program that offers a range of  similar features: MAGIX Music Maker (see my review).

So is the venerable ACID now starting to look a bit long in the tooth? Or has this latest update given it a new lease of life?

ACID Pro 8 – the interface has been given a spruce up. But is that enough?
Let me explain what ACID does. It falls into a category of software known as a Digital Audio Workstation or ‘DAW’. Essentially, it lets you compose and arrange music on multitrack timelines by adding clips one beneath the other. These clips may take the form of pre-recorded ‘loops’ – fragments of music that can be seamlessly joined together to create a score. Even non-musicians can do that. You just pick instruments such as guitars, organs or drums and…

…um, well, actually that was the first problem I encountered. According to the ACID web site, the software comes with 9GB of new ACIDized loops. The only problem was that I couldn’t find them. The help system told me to click a ‘Get Media from the Web’ button. But when I did that I just got advertising for other MAGIX products. It was forced to Google for assistance. Finally I discovered that I had to download loops via the Help menu. Having downloaded these (it takes hours on a slow connection like mine) you then have to run no less than seven installation programs, each of which prompts you to click through several dialogs to accept installation settings and licence terms. The loop collection installers even demand that you select between a Standard and Custom installation in spite of the fact that no custom installation is actually available (I tried it – it wasn’t there). I mean, what! Frankly, people, this is all a bit of a palaver and the loops should have been installed simply and automatically.

The Installer seems to go on forever…
Once they’d been installed I naively expected them to be available from a docked window in the ACID environment. No such luck. I eventually discovered that they had been conveniently installed into the directory C:\Users\Public\Documents\MAGIX\Common\Loop Collections and I had to use the built-in disk browser to navigate to them. By now I was starting to wonder if anyone had bothered to test the installer. Surely someone would have noticed that it is not likely to inspire a feeling of joy, contentment and goodwill in the end user!

In principle, the ACID Media Manager should provide a simple way of finding loops from within the environment. The Media Manager has its own docked window. When I opened this window, a message appeared stating: “The Media Manager is not installed”. I contacted MAGIX to ask where it was. I was told:
Media Manager is deprecated and not fully supported.  Media Manager installs separately from Acid.  If customers want to use it they can install it here.  https://support2.magix.com/customer/en/vegas_legacy_get?file=extras%252Fmediamanager24b.exe
Deprecated, not fully supported? And yet has its own docked window? In installed it anyway but it still didn’t show up in the workspace. Well, it was worth a try…

OK, so once the loops has been downloaded I was ready to go. The good news is that ACID makes it really easy to create music just by dragging and dropping loops, extending or cutting them, changing their pitch and adding effects such as amp distortions, echoes and delays.

The simplest way to create a composition is to ‘pick and paint’ – that is, you pick a few loops, drop them onto tracks and then extend the sounds by dragging them with the mouse to ‘paint’ them onto specific portions of the track. You can divide your music into named sections – intro, verse, chorus and so on. And if you need to change the key or the tempo, you can do that for the entire project or for individual clips. You can also change rhythms by applying ‘grooves’ (pre-defined sets of rhythmic properties) to a track. And you can add your own recorded audio from a connected instrument or microphone if you plan to add vocals.

This is the first major update to ACID in about ten years. There are some obvious changes, such as the redesigned user interface and some less obvious changes such as the change to a 64-bit architecture. There are also two ways to acquire the software. You can either buy it outright for £119 or you can rent it (or ‘subscribe’ if you prefer) for £5.99 per month.  Personally I hate subscriptions to software. However, MAGIX says that subscribers have the added advantage of getting “all the updates, new features, new instruments and effects as soon as they are released” and also benefits from “exclusive instruments like Vita Pop Brass and Orchestral Ensemble and effects like Analogue Modelling Suite to help you stay ahead of the game.” Frankly, it seems a bit unfair to penalise those people who’ve stumped up the full £119 purchase price by omitting these features.

Read more: https://www.magix.com/gb/music/acid-pro/new-features/

So, twenty years after using the first version of ACID, how do I think it’s stood the test of time? In brief, I like the way it works. It makes it easy to create good-sounding multi-instrument music tracks just by drawing on a timeline using a mouse and a set of pre-recorded loops. Twenty years ago that seemed cutting edge. Now, not so much. But even so, ACID does a pretty good job, at a pretty good price and, once you find and download them, the loops are also pretty good.

But there’s nothing remarkable. No killer features. And while the software itself is quite nice, the installer is as friendly as a cornered rat. Moreover, the fact that the Media Manager has its own window in the user interface even though it is not supported by the software does not inspire confidence.

So, I have to conclude that ACID is a nice program that’s been given a much needed update after being neglected for a very long time. But it is still not all it should be. The software needs more love, care and attention to detail if it is to compete against more modern rivals.

Tuesday 24 April 2018

MAGIX ACID 8 Pro Released

The loop-based Digital Audio Workstation ACID Pro is back with its first major update in ten years. MAGIX Software says that it has completely overhauled the software and given it a new, modern interface. ACID lets users create music easily by arranging and editing pre-recorded 'loops' onto tracks. The new version is available either as a one-off purchase or by subscription (ACID Pro 365) which includes regular updates.

Prices and Availability:
ACID Pro 8 –£119.99
ACID Pro 365 – from £5.99 per month

More information at: https://www.magix.com/gb/music/acid-pro/

Saturday 14 April 2018

Movavi Video Suite 17 review

£59.95 - https://www.movavi.com/suite/

I have to admit that until the company contacted me recently, I have never even heard of Movavi Video Suite. This is perhaps not too surprising since there are so many video editing packages now available for Windows that it is becoming increasingly difficult you keep track of them all.
Given the intense competition in this field, the first thing I wanted to know is whether there is anything that differentiates Movavi Video Suit from its rivals?

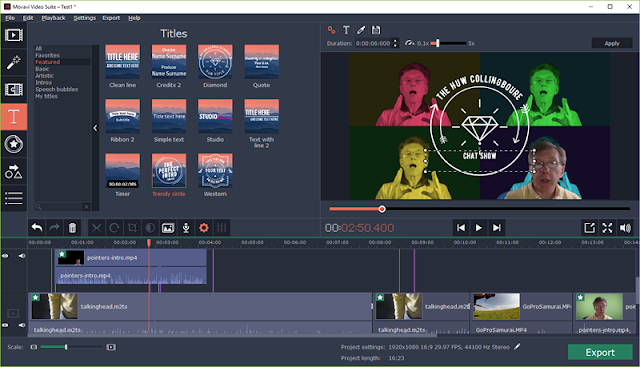
Movavi Video Suite lets you edit videos, complete with special effects and animated intros
This is what the company says: “Movavi Video Suite is comprehensive video making software that helps you create professional-looking movies and slideshows on your home computer – even if you have no experience. Incorporate music, create text captions, apply visual effects and transitions – you can do whatever you want with your video. In addition to the video making app, Movavi Video Suite contains a number of useful apps to help every video maker: powerful video converter that supports 180+ media formats, convenient utility for burning DVDs, a special tool for digitizing analog video, and more.”

What this actually means is that you get a fairly simple video-editing package and screencast-recorder plus a few associated tools to save in various image, video and sound formats. But is that really enough to make this program stand out from the crowd?

Let’s see how it works.

The principal application is the video editor. This gives you a few tracks arranged on the timeline – two tracks for video, two for sound. You can drag clips onto the tracks and use the second video track for ‘picture in picture’ effects (one clip running in a small rectangle overlaying the main clip). You can move, cut and copy clips and you can add transitions to fade one clip into another or apply effects such as ripples, slides, zooms and so on. You can also add text and animations to another track. These may include ‘speech bubbles’ and ‘thought bubbles’, animated intro sequences. The text and font-styles can be edited in the preview window.

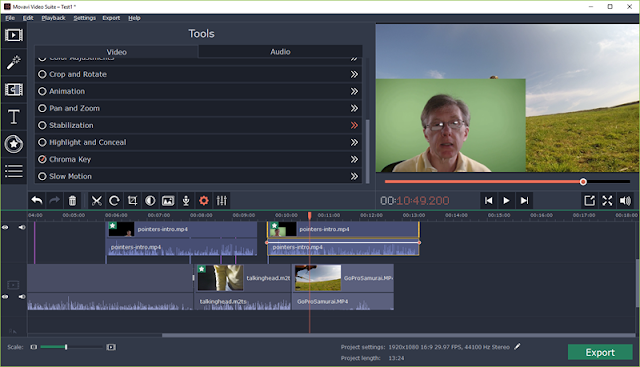
Here I am overlaying the main video with a ‘talking head’ clip that I filmed in front of a green screen

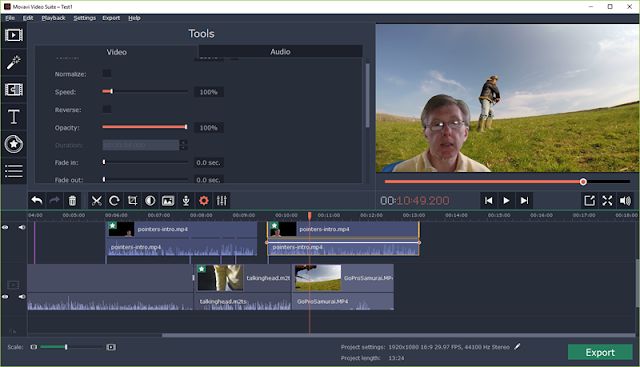
Here is the same clip with ‘Chroma key’ applied to remove the green background
Movavi Video editor has most of the other features you’d expect in an entry-level video editing package, such as filters to change colours, add blurs, apply a ‘sketch’  effect or lens flares; pan-and-zoom to magnify or move across a video; the ability to add images – either loaded from disk or in the form of drag-and-drop ‘clip-art’; it has a number of animated annotation such as arrows, circles and boxes (very useful if you are making tutorials in which you need to highlight certain things shown on screen); and it even has a key frame animation capability which lets you select elements and smoothly animate them across the screen between two locations at two time-points marked onto one of the clips in the timeline. It has a video stabilizer to remove camera shake plus a reasonably effective Chroma key (green screen) tool that lets you make coloured backgrounds transparent. This is useful if you want to add a ‘talking head’, for example, over some other background video.

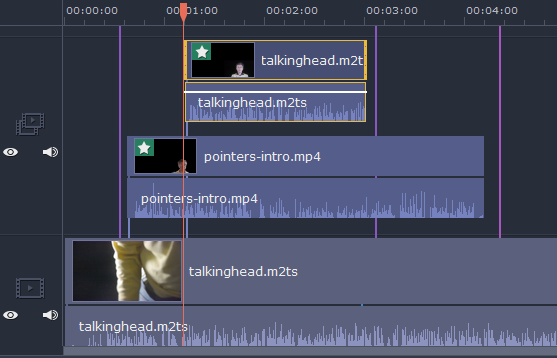
There are only two video tracks in the editor but, as you can see here, you can arrange multiple clips in the top video track
Note that only two tracks are available for video clips. However, the ‘picture in picture’ track rather oddly allows multiple clips to overlay each other – which is a bit like having extra video tracks even though they are not shown as such. Some video suites offer dozens of video tracks; that might be useful for complex projects. But to be honest, for home and online videos, most of the time one or two video tracks will be sufficient. For very ambitious video projects, however, the two-track limitation may be a barrier. Another limitation is the lack of support 360-degree videos (recorded by cameras with 360-degree functionality),  though the company does have a different product that has this capability.

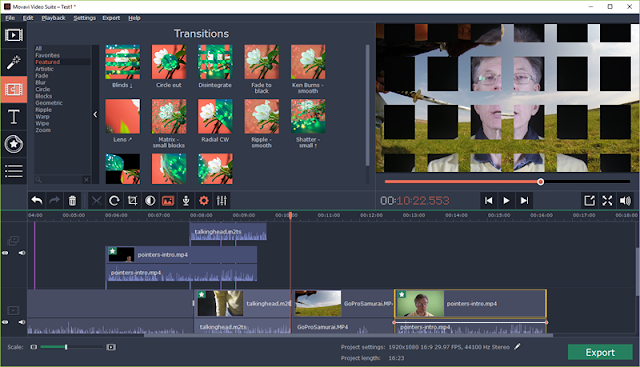
You can apply transitions to merge one clip into another. Here the ‘disintegrate’ effect breaks one video into animated squares to reveal the next clip 
The software supports a good range of import/export formats including all the most popular video types such as MP4 (in several ‘flavours’), AVI, MOV, MPEG-1, MPEG2, WMV and many others. Audio conversion is also provided to save sound files in MP3, WAV, AC3 and so on.

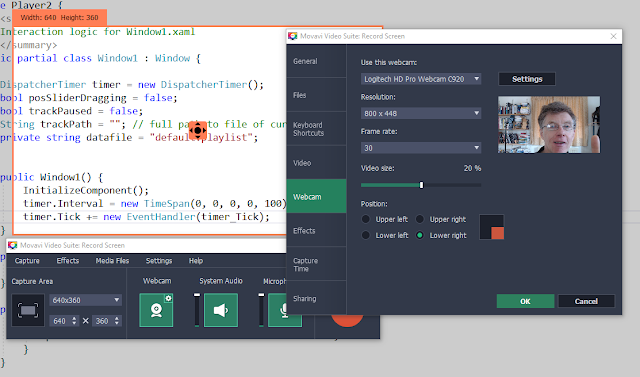
The suite include screencasting utilities. There is a decent screen capture tool that lets you select areas of the screen, optionally including webcam video  capture, and it can include mouse-click highlights in the screen capture. This is a simple, straightforward and effective tool.

In addition, there is also a dedicated webcam recorder which, however, has the annoying side effect of producing audio feedback (a loud hooting noise) if you forget to disable the PC speakers when recording. This is bizarre since the webcam recorder that’s integrated with the screencast recorder doesn’t suffer from audio-feedback.

If you need to record software, the screencast tool does a great job. You can even record video from your webcam at the same time that you record action from your computer screen
Movavi Video Suite can also record sound, burn audio or video to CD, DVD or Blu-ray and create slideshows from a series of still photographs. The software provides alternative ‘easy’ or ‘full’ user interfaces. If you choose the full interface you are presented with the complete video editor. If you choose the simple interface, you are shown some task-specific dialogs. For example, when creating slideshows, the easy interface lets you select images, optionally add some music and then it generates the slideshow complete with animated transitions.

In summary, Movavi Video Suite is a good tool for making home or YouTube videos or screencasts. It is fairly limited in functionality so don’t expect to have all the editing tools you would get with more complete video editing suites such as Adobe Premiere or Magix VEGAS. On the plus side, however, it is really, really easy to use. Even fairly user-friendly video editing packages such as Cyberlink PowerDirector or Corel Video Studio can be intimidatingly complex for the newcomer to video production (see more video editor review HERE). The learning curve of Movavi Video Suite is much less steep than for those programs. So, while this is definitely not a program for professional-grade production, it would be a very good choice for the non-specialist user who wants to get editing projects done quickly and easily.

If you are interested in video making software, there’s a free trial available, so if you aren’t sure if this is right for you, test it out first.